DOCOVA User Guide
1.1.3. Widgets and the Widget Layout
1.1.4. Workspace Actions and the User Profile
1.1.5. Application and Widget Actions and App Search
1.2.3. Workspace Actions and the User Profile
1.2.4. Panel Actions Button and Menu
2.1. DOCOVA Application Architecture
2.2. Application Functionality
2.4. Authentication Authority and Co-existance
2.5. Changing an Application’s Design
3.1. DOCOVA Libraries System Application
3.3. Managing an Individual Library
3.5. Working with Folders and Sub-folders
4.3. Changing Your Mobile Workspace Style
4.4. Exposing DOCOVA Applications for Mobile
5. The DOCOVA Plug-in and Windows Integration.
5.2. DOCOVA Explorer Features and Usage
5.2.3. Application Integration
5.2.5. Windows Desktop Integration
|
1. DOCOVA Workspace |
||
The first thing users will see when they open DOCOVA is the DOCOVA Workspace.
The Workspace allows users to manage their applications and libraries and interact with productivity tools.
There are two types of Workspaces available to users. One is the Standard Workspace and the other is the Tiled Workspace. Please see the sub-sections below for more information on these Workspaces and how to use them.
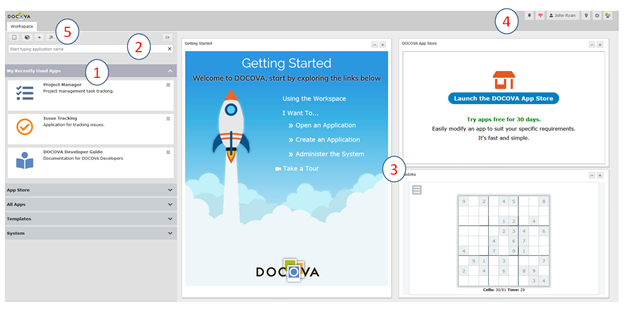
1.1. Standard WorkspaceThe Standard Workspace is the default workspace that opens in DOCOVA. Figure 1.0 below shows the Standard Workspace. Areas that make up the workspace are numbered from 1 through 5 in the image below. They are: 1) The Applications Pane 2) Application Search 3) Widgets and the Widget Layout 4) Workspace Actions 5) Application and Widget Actions Each of these areas is explained in more detail in their corresponding sub-sections under Standard Workspace.
|
||||
1.1.1. The Applications Pane |
||||
The Applications Pane in the Workspace is designed to help you manage and gain access to applications in DOCOVA.
There are four default sections, but you can add more in order to manage the applications you use.
The default sections are;
1) My Recently Used Apps – Whenever an application is opened, it automatically appears in the recently opened section. This tracks what applications you use the most and displays them in a list.
2) All Apps – This is a listing of all the applications the user has at least Reader access to. If a user does not have access to an application it will NOT be displayed in this list.
3) Templates – Any applications that are configured as Templates are shown here. This makes it easy to find and modify template applications that other applications are based off of.
4) System Apps – These applications are built in "system" applications. They can’t be modified or changed and are accessible depending on a users’ access level. There is more information about System Apps below.
In Figure 1.0, the Applications Pane shows five sections. A new section was added called Collection where several applications have been grouped together into a custom section.
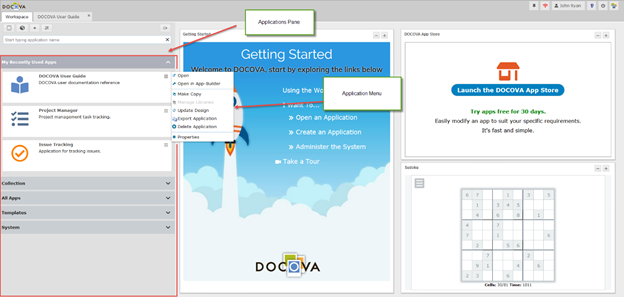
Figure 1.0
About Applications in the Workspace
Use a single click to open an application. The application will open into its own pane in the workspace. See figure 2.0 below.
Opening applications into their own tab in the workspace makes it easy for users to easily jump between applications without having to open more browser tabs or deal with layers of sliding windows.
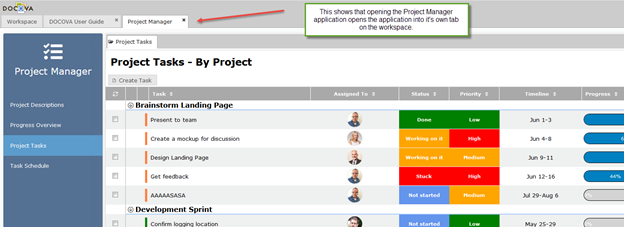
Figure 2.0
Application Menu
In the Standard Workspace, click on the three bar icon button on an application to open the Application Menu. Figure 1.0 above shows what the Application Menu looks like when the 3 bar button on each application is clicked. The following details each of the menu items.
Open
Choosing this menu option opens the corresponding application or library.
Open in App Builder
Choosing this menu option opens the corresponding application into the App Builder.
Make Copy
This option will create a copy of the corresponding application.
Manage Libraries
This option allows you to manage more than one library into a "Library Group". When the group is opened, all of the Libraries are opened in the same navigational layout.
Update Design
This option will allow the update of the design of the corresponding application from the design template.
Export Application
This option allows for the exportation of the current application. This can be used as a way to move applications to other DOCOVA instances or a quick and temporary backup method.
Properties
Shows the properties for the current application. Depending on the User’s access level to the current application is what determines what they can change about the application properties.
System Applications
The System section in the Applications Panel contains system applications. These applications can not be modified in the Standard Workspace but they can be added or removed from Workspace panels in the Tiled Workspace.
There are six system applications available depending on what access level you have as a user. Figure 3.0 below shows the six system applications. They are explained below.
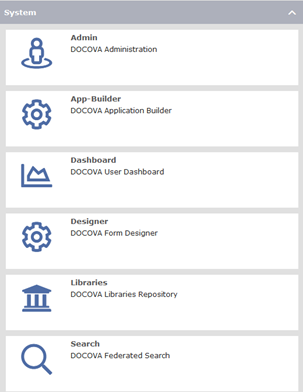
1) Admin
"Admin" is short for Administration. This application is accessed by Administrators and is responsible for administrating DOCOVA instances.
2) App Builder
The App Builder application enables Developers and Citizen Developers to create business applications in DOCOVA. Another way to open the App Builder is to open it from the Application Menu as explained above. The difference is that if you open the App Builder from the Application Menu it automatically navigates you to the current application. Opening the App Builder application in the System section opens App Builder and then you have to navigate to the application you want.
3) Dashboard
The Dashboard application is similar to the widget layout functionality of the Standard Workspace. The Dashboard comes in handy when you are using the Tiled Workspace because it becomes your "widget" workspace. The Dashboard application also has a few more options than the Standard Workspace’s widget interface in terms of sharing with other people or teams.
4) Designer
The Designer is similar to the App Builder except that it is limited in it’s scope. It is specifically designed to create "Forms" for Libraries whereas the App Builder helps you create whole applications. Libraries are a special kind of application template and designing forms for them requires the Designer.
5) Libraries
As mentioned in (4) above, Libraries are like a special template in DOCOVA. Library applications are excellent for storing page style information and files, like Policies and Procedures as an example. Libraries also have a number of strict document management controls that can be used with them. As such, Libraries have their own interface. Although you can open a library by itself, there are other ways to have several libraries available at once and that’s what this applications allows you to do.
6) Search
DOCOVA has a robust text searching capability. See the next documentation section entitled 2) Application Search to read more about the Searching app.
1.1.2. Search Application |
||||||||||||||||||
|
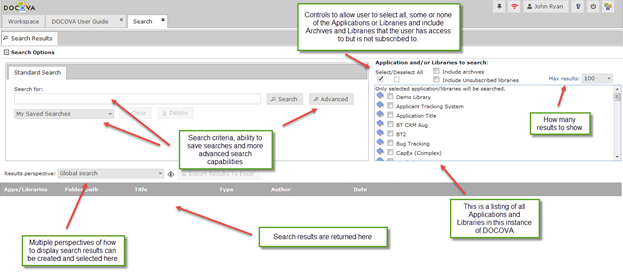
DOCOVA’s federated searching capabilities makes it convenient to find information across all off your applications and libraries. Searching content in DOCOVA is a rich text search. This means all field and text (paragraph style) information is searchable as well as any content contained in attached files like MS Word and Excel files. Searching content exists within applications or libraries themselves at the view level where you search across many documents and folders in the case of libraries. The Search application searches rich text content across applications and libraries. You can search across none, one or many applications and libraries at a time. To perform a search, start by expanding the System section of the left hand side Application Pane of your Workspace. Click on the Search application to open it. Figure 1.0 below shows the Search application interface. See more details about the search interface below.
Figure 1.0
|
||||||||||||||||||
1.1.3. Widgets and the Widget Layout |
||||||||||||||||||
In the Standard Workspace, the right side of the workspace is reserved for the Widget Layout and Widgets. In Figure 1.0 below, the Widget Layout area is outlined in red.
There are a number of layouts that can be chosen. The layouts help users organize the widgets that they chose to use.
Widgets can be anything from informational pages to views or folders from applications or libraries or charts like pie charts showing you the progress of projects.
Widgets are really flexible function windows that improve a user’s productivity.
Figure 1.0 below is showing the default layout and widgets when you access DOCOVA for the first time.
The Getting Started widget is an Page with helpful links to more information about getting started with DOCOVA. Organizations might use a similar widget to help new employees navigate information.
Another default widget is the DOCOVA App Store where there are apps, templates and more information to be had.
The bottom left widget shows a game, Sudoku…which is an application in which the game can be played, or, it can be played in the widget.
Read more below on how to choose a layout and add or remove widgets to customize your workspace to suit your own needs.
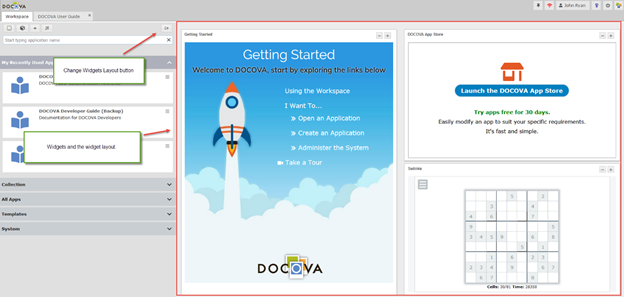
Figure 1.0
Choosing a layout:
To choose a layout, click on the Change Widgets Layout button. It is shown in Figure 1.0 above.
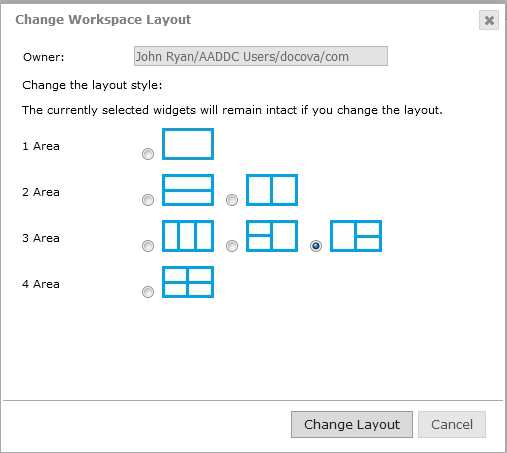
When you click on this button, you will see the following dialog.
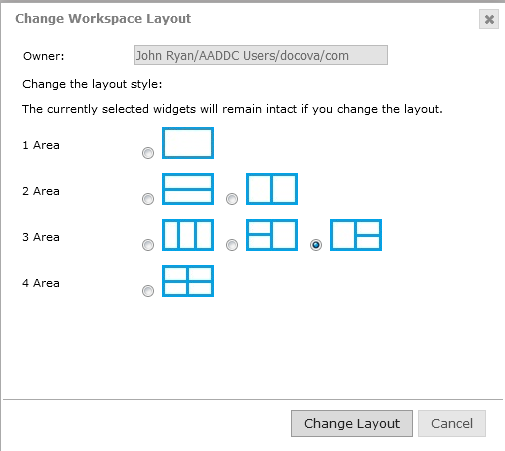
Figure 2.0
This dialog will allow you to pick a layout for your widgets. Depending on your needs, you can select a layout that will allow you to use one, two, three or even four widgets.
Choose your desired layout and click on the Change Layout button.
NOTE: If you already have a layout and change it to a different layout, DOCOVA will rearrange your widgets to fit your newly selected layout. If desired, it is easy to rearrange your widgets.
Adding and Removing Widgets:
Each widget space in a layout has two buttons, a plus (+) button to add/change a widget and a minus (-) button to remove a widget.
Figure 3.0 shows adding a widget by clicking on the + button.
You will see a dialog pop open where you can select an available widget from the widget list.
Once a widget has been selected from the list, click on the Use Widget button to start using that widget.
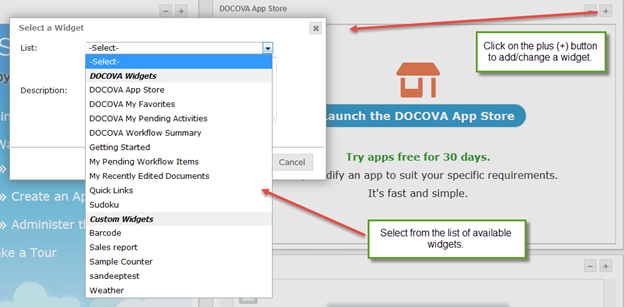
Figure 3.0
To remove a widget from your workspace is easy to do. Figure 4.0 below shows removing a widget.
Click on the minus (-) sign button to remove a widget.
You will see the remove dialog as shown in Figure 4.0 below.
Click the Remove button to remove it from your workspace.
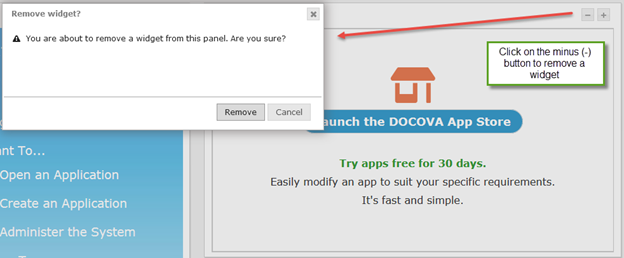
Figure 4.0
Creating new Widgets:
DOCOVA initially comes with several ready to use widgets, however, widgets are easy to create.
In order to create a widget, you need to have rights to be able to create applications in the App Builder.
IT Developers can create widgets and as well as any Citizen Developers that IT might have given this ability to.
Figure 5.0 below shows the widget listing interface where widgets can be turned on or off to show them or not.
When a widget is created in the App Builder, it automatically becomes available for use on the Workspace in the Add Widget dialog.
Figure 6.0 below show the development layout interface for widgets.
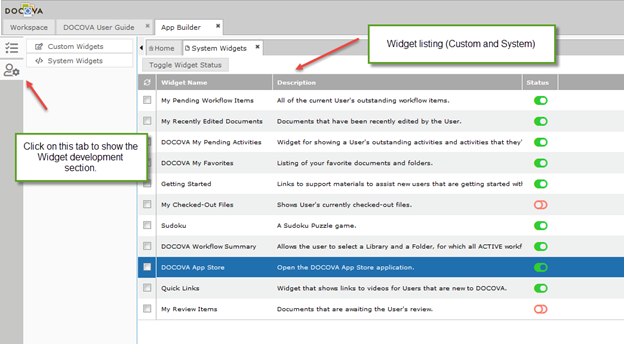
Figure 5.0
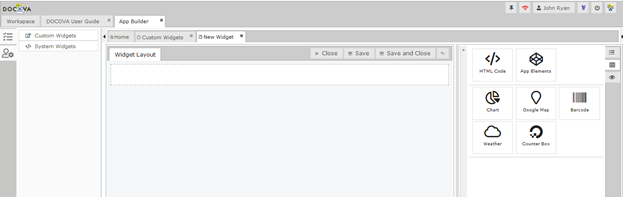
Figure 6.0
In Figure 6.0 above is the development interface for widgets. The interface is very similar to developing a Page or Form in an Application in the App Builder.
The table below goes over each available element that can be used to create a widget.
|
Element name |
Icon |
Description |
|
HTML Code: |
|
This is the HMTL element. In design mode it is an HTML editor. You can add any HTML you want. |
|
App Element: |
|
This is a very powerful element. Even though widgets only provide a few elements, this element exposes design elements in applications like pages, views or forms, which in turn provides the functionality of any of those elements. |
|
Chart: |
|
The chart element provides the ability to quickly build charts the lookup to view information in any application. Another way to do this is to create a page in an application that has one or several charts and then use that page as a widget. |
|
Google Map: |
|
Add google maps as a widget. This element will require you to acquire and activation key from Google. |
|
Barcode: |
|
The bar code element allows you to add a bar code. There are several bar codes to choose from. |
|
Weather: |
|
The weather element allows you to add a widget that provides the weather for a certain city. You could have several widgets for different cities. |
|
Counter Box: |
|
Counter boxes provide a quick way to lookup information from an application and display it in a clear and accessible way. |
The Dashboard Application
The Dashboard Application is very similar to the widget area of the Standard Workspace in that layouts are selected and widgets are added or removed from the Dashboard.
The widgets that are available are the same in both the Dashboard App and in the Standard Workspace.
The Dashboard has additional sharing options as well as more layout options.
The reason why there is a Dashboard and the same interface as the Standard Workspace is one of evolution. The Dashboard feature has been retained to support earlier versions of the product.
Initially DOCOVA had the Tiled interface and the Dashboard allowed for widgets for productivity. However, now DOCOVA has evolved to combine the applications, libraries and widgets into the one Standard Workspace.
1.1.4. Workspace Actions and the User Profile |
||
The Workspace Actions are the buttons on the Workspace at the top right of the screen. These six buttons carry out a number of different actions and functions.
Figure 1.0 below shows what actions on the Workspace look like.
The table below outlines the functionality of each of the action buttons.
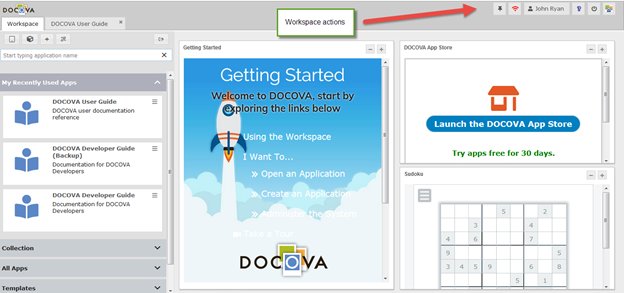
Figure 1.0
|
Action |
Button |
Description |
|
Pin tab state |
|
In DOCOVA, every application or library that is opened, opens into its own DOCOVA tab in the Workspace. This is different than many other platforms that open many browser tabs to open different applications and documents. DOCOVA, for the most part, runs in one browser tab and all subsequent tabs run within DOCOVA. Some users use the same applications and libraries everyday. To save steps when launching DOCOVA, you can "pin" the state of the tabs you had open in the previous session. To set this up open the applications you want to have open when you come into DOCOVA everyday. Once the apps are open in their tabs, click this button and pin the tab state. |
|
DOCOVA Plug-in status |
|
DOCOVA has an optional plug-in. The plug-in is not required to be running when using DOCOVA, however, for more sophisticated functionality the plug-in can be installed. Read more about the DOCOVA plug-in in the section called The DOCOVA Plug-in. This button monitors whether or not you have the plug-in running or not. If it is not running the symbol is red, if it is the symbol turns green. Additionally you can click on the button to view the status message. |
|
User Profile |
|
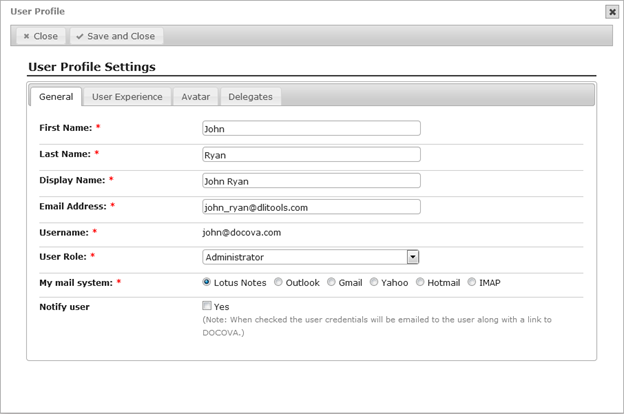
This button opens the User Profile dialog. The following image shows what the dialog looks like. There are four tabs in the User Profile; General, User Experience, Avatar and Delegates. Please see the User Profile Options table below detailing the options available.
|
|
Show User Help |
|
Click on this button to see the User Quick Start Guide and the Administration Quick Start Guide. Note: This button is being phased out as the documentation is being replace by this User Guide, a new Administration Guide and Developer Guide. This button will be removed in the next version of DOCOVA. |
|
Logout |
|
This button logs you out of DOCOVA. In the case of single-sign on, you may need to also log out of your other system, like O365 for example. |
|
About |
|
Clicking this button will show the DOCOVA About dialog. The about dialog shows the current version of DOCOVA that is running and the organization that it is licenses/subscribed to. It also provides buttons for downloading the DOCOVA Plug-in. Please see the section called The DOCOVA Plug-in for more information. |

User Profile Options
|
General Tab |
|
|
First Name: |
First name of the user for this profile. |
|
Last Name: |
Last name of the user for this profile. |
|
Display Name: |
This is the display name for the user. Usually it is the first name and last name combined. Organizations may have reasons to modify this. |
|
Email Address: |
This is the email address of the user. |
|
Username: |
This is a calculated username. Usually it is the first name initial followed by the last name, however, it can also be something like an email address so users can login using a username that is their email address just as many system do. |
|
User Role: |
A user of DOCOVA typically has one of two roles. One is Administrator, the other is User. Administrators have full access to the DOCOVA instance while Users have progressive access depending on access control rules. |
|
My Mail system: |
DOCOVA can integrate with many email systems and hence the user can pick from several. |
|
Notify user: |
When an Administrator changes the password of a User, or adds a User, this option will notify the user via email of the change. |
|
User Experience Tab |
|
|
Workspace Style: |
Select which workspace style to use, either Standard or Tiled. |
|
Mobile Workspace Style: |
Select which mobile workspace to use, either Standard or Tiled. |
|
Can Create Applications? |
Determines if the user can create new applications or not. The option is only available to Administrators to change and allows the user to modify the design of applications in the App Builder. |
|
Number Entry Format: |
Specifies the default number format to show to the user in view columns and in forms. For example, a North American user might see a number formatted for thousands and decimals like 1,234.56 while a European user might use 1.234,56. |
|
Locale (Language): |
Sets the language for the DOCOVA interface. Currently the languages available are English, French, German, Spanish and Japanese. Contact us for more languages. Note: Changing the language changes the DOCOVA system interface text. Text used to develop application will be in the text language used at development. Applications can be made multi-lingual through the application’s design. |
|
Time Zone (Region): |
Choose the time zone in which you reside. Typically date/time values will follow the date/time of the local server. |
|
Load Library Folders: |
For Libraries, when they are opened, the Folders contained in them are loaded. Here you can choose to load all the folders when you open the Library, or you can choose to open the Folders and sub-folders when they are clicked on. The reason for this is for performance sake. You may have a library that has many folders and sub-folders many levels deep and many within each level. Loading upon clicking loads only what you need and are interested in. |
|
Default View Show Option: |
Documents in folders in libraries in DOCOVA are often go through a workflow. This means the documents can be in different statuses as they are drafted and move toward approval and release. By default, a folder will show Current versions, that is, documents that are approved and released. In the folder, any of these options can be selected on the fly. However, sometimes the documents in a view are not ones that need to go through any kind of workflow, hence, you may want to set this option to "All versions" to show everything no matter what their status is. The options available to set it to are; Current versions, All versions and Pending releases. |
|
Max Recent Edit Count: |
This option relates to the ‘My Recently Edited Documents’ widget. It determines the number of records to be tracked and shown as being recently edited. This allows you to quickly see the last 10 documents edited, or perhaps the last 20, for example |
|
Max Recent Used App Count: |
This option relates to the number of applications to show in the "My Recently Used Apps" section of the Applications Pane. You may want to only see the last 3 applications that you used, or the last 10 depending on what is easiest. |
|
Redirect to mobile client: |
If you are accessing DOCOVA on your mobile phone and have the DOCOVA mobile application installed, you can set this option to “Auto Redirect” to have DOCOVA launch the native mobile client when DOCOVA URLs are launched from email instead of opening DOCOVA in the mobile web browser. |
|
User Experience Attributes: |
These fields are used to enable automatic filtering of Library perspectives. For example, an Attribute of ‘Division’ with a Value of “West Coast” could be used to auto filter a perspective to only show records where the Division = West Coast. Since the Value could be specific for each user, perspectives can be made more efficient for users. The Attributes list is based on defined View Columns. This option only applies to Libraries. |
|
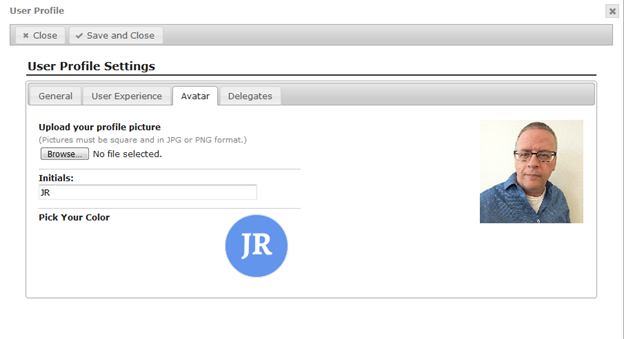
Avatar Tab |
|
|
Dialog |
The Avatar tab in the dialog looks like the following image. The Avatars of users are using in several places including in views and in documents.
|
|
Profile Picture: |
Upload your profile picture. When uploading, DOCOVA will automatically resize the image for it’s avatar needs. |
|
Initials: |
Add user initials. Usually these are capitalized. |
|
Pick Your Color: |
If an avatar picture is not provided, the initials circle symbol will be used instead. By clicking on the circle you can pick a circle/initial color combination to use. |
|
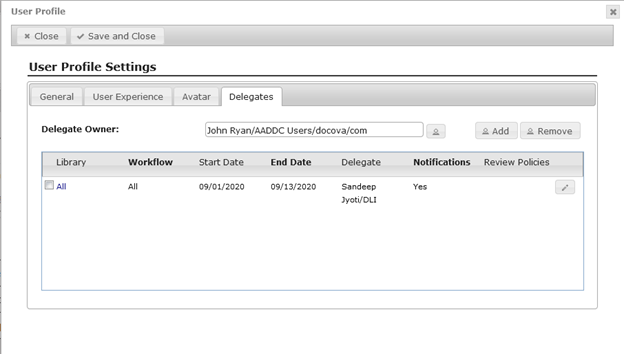
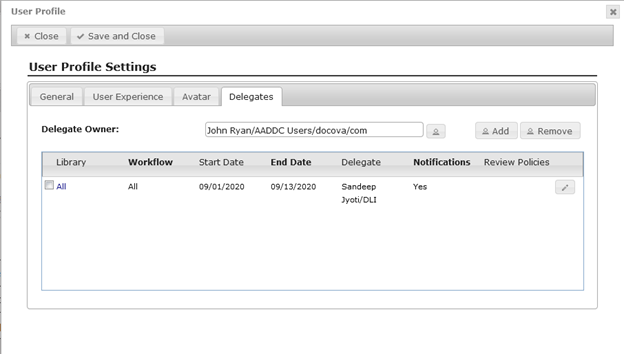
Delegates Tab |
|
|
Dialog |
DOCOVA Delegates allow you to designate one or more users to Review or Approve documents on your behalf. For example, if you are going away on vacation. See the following image.
|

1.1.5. Application and Widget Actions and App Search |
||
Application action buttons, the widget layout button and application search field are located at the top left of the Standard workspace above the Application Pane.
Figure 1.0 below shows these action buttons and search.
See the table below outlining the details of these actions.
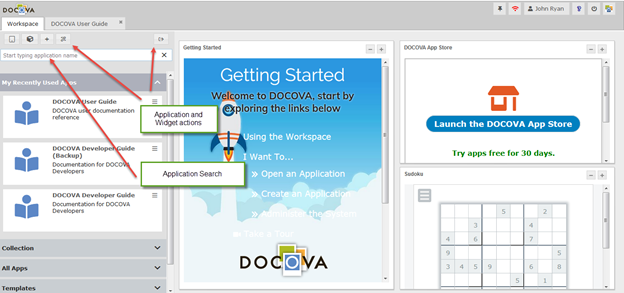
Figure 1.0
Application and Layout Action Buttons and App Search
|
Action Button |
Icon |
Description |
||
|
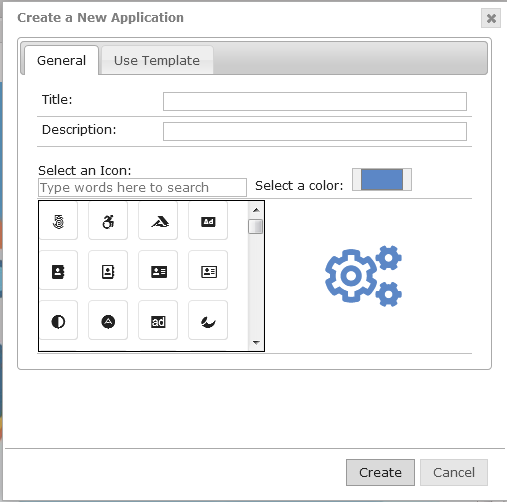
Create Application |
|
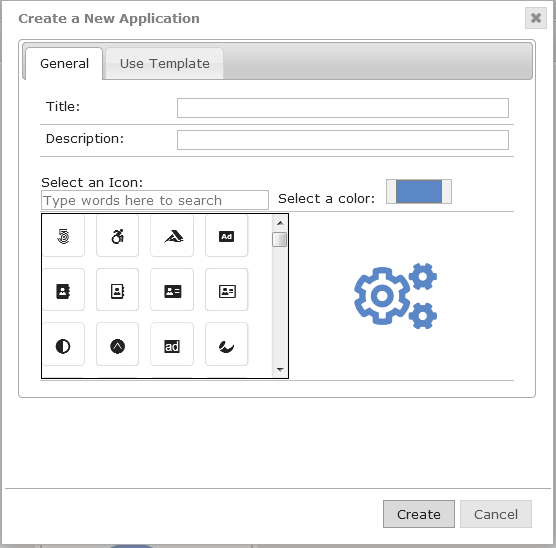
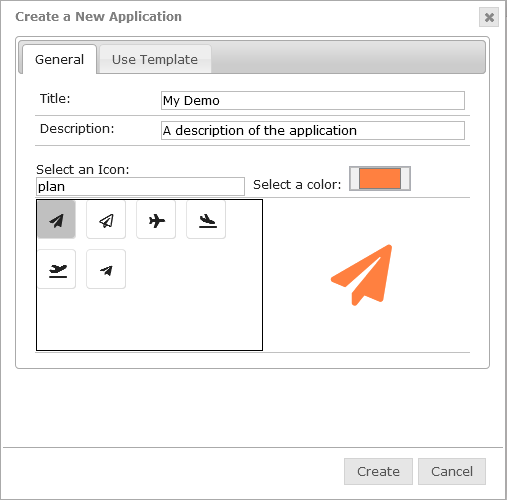
Click on this button to create a new application. When clicking on this button, you will get the Create a New Application dialog. The next image shows the dialog. Simply fill in the Title for the application, a description, pick an icon, pick a color and click Create.
|
||
|
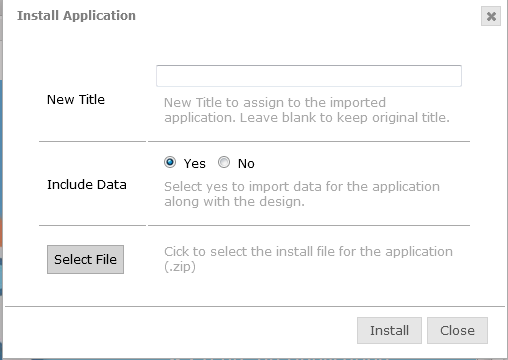
Install Application |
|
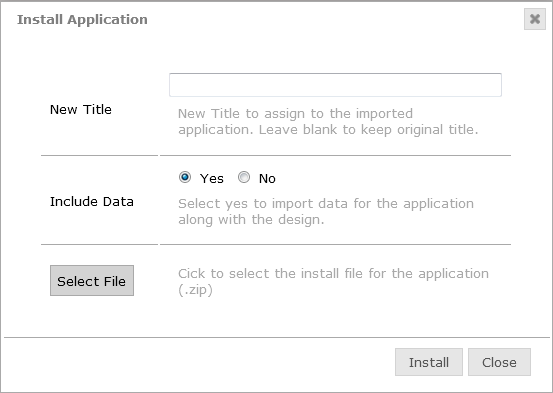
Click this action button to install an application. This option works in conjunction with an exported application. When an application is exported a .zip file is created with the design and content. This can be a way of creating an application on one instance and moving installing it on another instance of DOCOVA. It can also be used as a way to make a copy of an application and it’s data. When clicking on the Install Application button, you will see the following dialog. Provide a New Title for the new application. Choose to include the data or not. Select the .zip file and click Install.
|
||
|
New App Group |
|
This button allows you to create a new App Group. In the Applications Pane there are four sections, My Recently Used Apps, All Apps, Templates and System Apps. However, you can create your own section and add the applications you use most frequently. When you click on the button you will see the Create New App Group dialog as shown below. Add the new group name, then select the apps you want to put into that group and click the Create button. Now a new section will be added with those apps in it.
|
||
|
Manage App Groups |
|
Manage App Groups is similar to New App Group. You get the same dialog except now you select the Group you want to edit and add or removed apps from it then click the Save button. |
||
|
Change Widgets Layout |
|
The Change Widget Layouts button was reviewed in the Widgets and Widget Layout section. When you click on this button you get a dialog where you can select the widget layout that you want to use.
|
||
|
|||||
1.2. Tiled Workspace |
|
||||

The Tiled Workspace is set through the User Profile. Figure 1.0 below shows the Tiled Workspace.
Areas that make up the workspace are numbered from 1 through 5 on the image below. They are:
1) Workspace Panels
2) Application Tiles
3) Workspace Actions
4) Panel Actions
Each of these areas is explained in more detail in their corresponding sub-sections under Tiled Workspace.
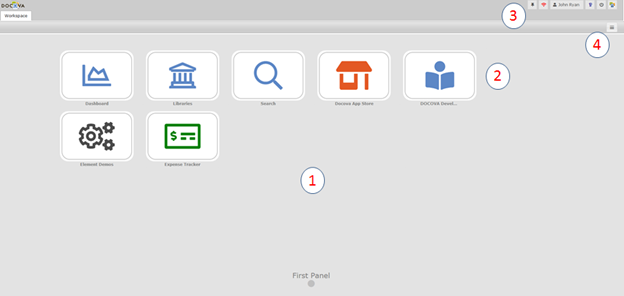
Figure 1.0
1.2.1. The Workspace Panels
Workspace Panels in the Tiled Workspace are areas where you can add applications and libraries.
Figure 1.0 below shows one panel of a Tiled Workspace. The panel has several applications on it. There is space for 18 applications and libraries on a single panel. You can create as many panels as you want. Panels are a way to group and manage applications together. For example, all financial applications could be on a "Financial" panel. Or, all Sales related applications can be on a panel named "Sales".
Drag and drop application tiles to move them to a new position on the panel.
Drag and drop application tiles over the navigation arrows on the left and right sides of the panels in order to drag applications to other panels. As you drag an application make sure your mouse cursor rolls over the arrow. As you drag an application you will see a grid show which outlines where you can drop an application.
In Figure 1.0 you can see the left and right hand side navigation arrows. Clicking on one of these arrows will move you forward or back one panel.
You can also navigate directly to a panel by clicking on one of the page circles at the bottom of the panels. Each circle represents a panel that has been created. If you roll over one of the circles the panel name will pop up, that way you know what panel it represents and clicking on it will take you directly to that panel.
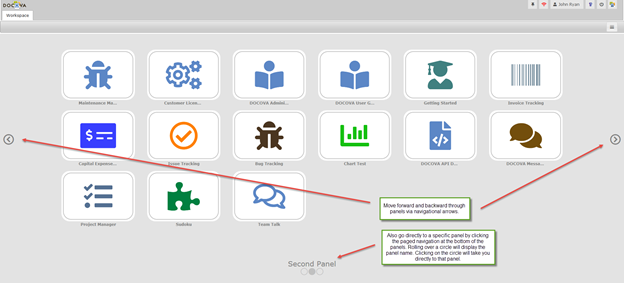
Figure 1.0
1.2.2. Application Tiles
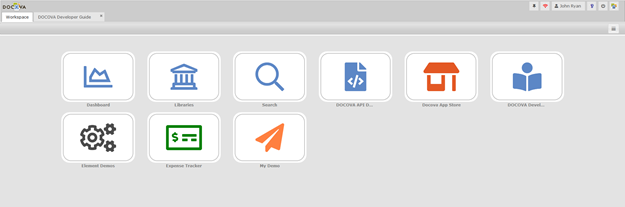
DOCOVA Libraries and Applications appear on the Tiled Workspace panels in the form of square "tiles". Figure 1.0 below shows the Tiled Workspace with applications on it.
Each tile shows it’s associated icon and color for ease of recognition. The title of the application appears under the tile and when mousing over the tile, the description of the application pops up.
Drag and drop application tiles to move them to a new position on the panel.
Drag and drop application tiles over the navigation arrows on the left and right sides of the panels in order to drag applications to other panels. As you drag an application make sure your mouse cursor rolls over the arrow. As you drag an application you will see a grid show which outlines where you can drop an application.
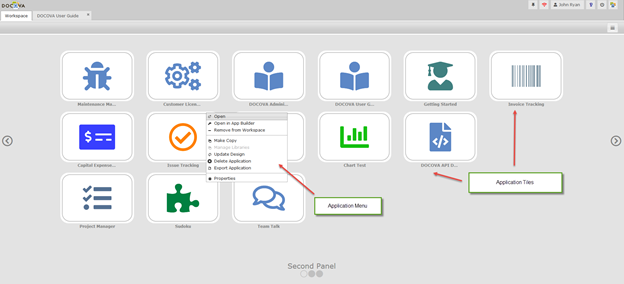
Figure 1.0
Similar to the Standard Workspace, each application has its own Application Menu. To open the Application Menu, right click on an application.
Figure 1.0 above show the Application Menu when the Issues Tracking application was right clicked. The Application Menu items are detailed below.
Application Menu
In the Standard Workspace, click on the three bar icon button on an application to open the Application Menu. Figure 1.0 above shows what the Application Menu looks like when the 3 bar button on each application is clicked.
The following details each of the menu items.
Open
Choosing this menu option opens the corresponding application or library.
Open in App Builder
Choosing this menu option opens the corresponding application into the App Builder.
Make Copy
This option will create a copy of the corresponding application.
Manage Libraries
This option allows you to manage more than one library into a "Library Group". When the group is opened, all of the Libraries are opened in the same navigational layout.
Update Design
This option will allow the update of the design of the corresponding application from the design template.
Export Application
This option allows for the exportation of the current application. This can be used as a way to move applications to other DOCOVA instances or a quick and temporary backup method.
Properties
Shows the properties for the current application. Depending on the User’s access level to the current application is what determines what they can change about the application properties.
1.2.3. Workspace Actions and the User Profile
The Workspace Actions are the buttons on the Workspace at the top right of the screen. These six buttons carry out a number of different actions and functions.
Figure 1.0 below shows what the actions on the Workspace look like.
The table below outlines the functionality of each of the action buttons.
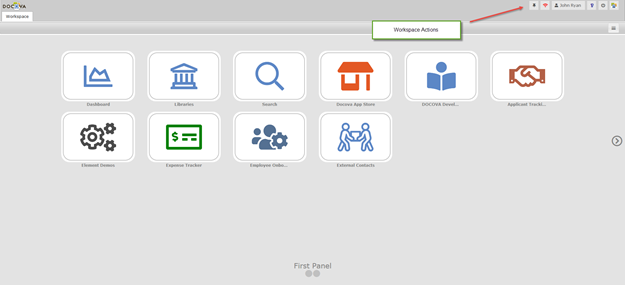
Figure 1.0
|
Action |
Button |
Description |
|
Pin tab state |
|
In DOCOVA, every application or library that is opened, opens into its own DOCOVA tab in the Workspace. This is different than other platforms that open many browser tabs to open different applications and documents. DOCOVA, for the most part, runs in one browser tab and all subsequent tabs run within DOCOVA. Now, some users use the same applications and libraries everyday. To save a couple of steps when coming into DOCOVA, you can "pin" that state of the tabs you have open in DOCOVA so that when you open it in the morning, the applications that you most often use are already open and ready to go. To set this up, simply open the applications you want to have open when you come into DOCOVA everyday. Once the apps are open in their tabs, click this button and pin the tab state. |
|
DOCOVA Plug-in status |
|
DOCOVA has a plug-in. The plug-in is not required to be running when using DOCOVA, however, for more sophisticated functionality in DOCOVA, the plug-in can be installed. Read more about the DOCOVA plug-in in the section called The DOCOVA Plug-in. This button simply monitors whether or not you have the plug-in running or not. If not, the symbol is red, if yes, the symbol turns green. Additionally you can click on the button for the status message. |
|
User Profile |
|
This button opens the User Profile dialog. The following image shows what the dialog looks like. There are four tabs in the User Profile; General, User Experience, Avatar and Delegates. Please see the User Profile Options table below detailing the options available.
|
|
Show User Help |
|
Click on this button to see the User Quick Start Guide and the Administration Quick Start Guide. Note: This button is deprecated as the documentation is being replace by this User Guide, a new Administration Guide and Developer Guide. This button will be removed in the next version of DOCOVA. |
|
Logout |
|
This button logs you out of DOCOVA. In the case of single-sign on, you may need to also log out of your other system, like O365 for example. |
|
About |
|
Clicking this button will show the DOCOVA About dialog. The about dialog shows the current version of DOCOVA that is running and the organization that it is licenses/subscribed to. It also provides buttons for downloading the DOCOVA Plug-in. Please see the section called The DOCOVA Plug-in for more information. |
User Profile Options
|
General Tab |
|||||||||||||||||||||||||
|
First Name: |
First name of the user for this profile. |
||||||||||||||||||||||||
|
Last Name: |
Last name of the user for this profile. |
||||||||||||||||||||||||
|
Display Name: |
This is the display name for the user. Usually it is the first name and last name combined. Organizations may have reasons to modify this. |
||||||||||||||||||||||||
|
Email Address: |
This is the email address of the user. |
||||||||||||||||||||||||
|
Username: |
This is a calculated username. Usually it is the first name initial followed by the last name, however, it can also be something like an email address so users can login using a username that is their email address just as many system do. |
||||||||||||||||||||||||
|
User Role: |
A user of DOCOVA typically has one of two roles. One is Administrator, the other is User. Administrators have full access to the DOCOVA instance while Users have progressive access depending on access control rules. |
||||||||||||||||||||||||
|
My Mail system: |
DOCOVA can integrate with many email systems and hence the user can pick from several. |
||||||||||||||||||||||||
|
Notify user: |
When an Administrator changes the password of a User, or adds a User, this option will notify the user via email of the change. |
||||||||||||||||||||||||
|
User Experience Tab |
|||||||||||||||||||||||||
|
Workspace Style: |
Select which workspace style to use, either Standard or Tiled. |
||||||||||||||||||||||||
|
Mobile Workspace Style: |
Select which mobile workspace to use, either Standard or Tiled. |
||||||||||||||||||||||||
|
Can Create Applications? |
Determines if the user can create new applications or not. The option is only available to Administrators to change and allows the user to modify the design of applications in the App Builder. |
||||||||||||||||||||||||
|
Number Entry Format: |
Specifies the default number format to show to the user in view columns and in forms. For example, a North American user might see a number formatted for thousands and decimals like this 1,234.56 while a European user might use 1.234,56. |
||||||||||||||||||||||||
|
Locale (Language): |
Sets the language for the DOCOVA interface. Currently the languages available are English, French, German, Spanish and Japanese. Contact us for more languages. Note: Changing the language changes the DOCOVA system interface text. Text used to develop application will be in the text language used at development. Applications can be made multi-lingual through the application’s design. |
||||||||||||||||||||||||
|
Time Zone (Region): |
Choose the time zone in which you reside. Typically date/time values will follow the date/time of the local server. |
||||||||||||||||||||||||
|
Load Library Folders: |
For Libraries, when they are opened, the Folders contained in them are loaded. Here you can choose to load all the folders when you open the Library, or you can choose to open the Folders and sub-folders when they are clicked on. The reason for this is for performance sake. You may have a library that has many folders and sub-folders many levels deep and many within each level. Loading upon clicking loads only what you need and are interested in. |
||||||||||||||||||||||||
|
Default View Show Option: |
Documents in folders in libraries in DOCOVA are often going through workflow. This means the documents can be in different statuses as they are drafted and move toward approval and release. By default, a folder will show Current versions, that is, documents that are approved and released. In the folder, any of these options can be selected on the fly. However, sometimes the documents in a view are not ones that need to go through any kind of workflow, hence, you may want to set this option to "All versions" to show everything no matter what their status is. The options available to set it to are; Current versions, All versions and Pending releases. |
||||||||||||||||||||||||
|
Max Recent Edit Count: |
This option relates to the ‘My Recently Edited Documents’ widget. It determines the number of records to be tracked and shown as being recently edited. This allows you to quickly see the last 10 documents editor, or perhaps the last 20 if you need. |
||||||||||||||||||||||||
|
Max Recent Used App Count: |
This option relates to the number of applications to show in the "My Recently Used Apps" section of the Applications Pane. You may want to only see the last 3 applications that you used, or the last 10 depending on what is easiest. |
||||||||||||||||||||||||
|
Redirect to mobile client: |
If you are accessing DOCOVA on your mobile phone and have the DOCOVA mobile application installed, you can set this option to “Auto Redirect” to have DOCOVA launch the native mobile client when DOCOVA URLs are launched from email instead of opening DOCOVA in the mobile web browser. |
||||||||||||||||||||||||
|
User Experience Attributes: |
These fields are used to enable automatic filtering of Library perspectives. For example, an Attribute of ‘Division’ with a Value of “West Coast” could be used to auto filter a perspective to only show records where the Division = West Coast. Since the Value could be specific for each user, perspectives can be made more efficient for users. The Attributes list is based on defined View Columns. This option only applies to Libraries. |
||||||||||||||||||||||||
|
Avatar Tab |
|||||||||||||||||||||||||
|
Dialog |
The Avatar tab in the dialog looks like the following image. The Avatars of users are using in several places including in views and in documents.
|
||||||||||||||||||||||||
|
Profile Picture: |
Upload your profile picture. When uploading, DOCOVA will automatically resize the image for it’s avatar needs. |
||||||||||||||||||||||||
|
Initials: |
Add user initials. Usually these are capitalized. |
||||||||||||||||||||||||
|
Pick Your Color: |
If an avatar picture is not provided, the initials circle symbol will be used instead. By clicking on the circle you can pick a circle/initial color combination to use. |
||||||||||||||||||||||||
|
Delegates Tab |
|||||||||||||||||||||||||
|
Dialog |
DOCOVA Delegates allow you to designate one or more users to Review or Approve documents on your behalf. For example, if you are going away on vacation. See the following image.
|
||||||||||||||||||||||||
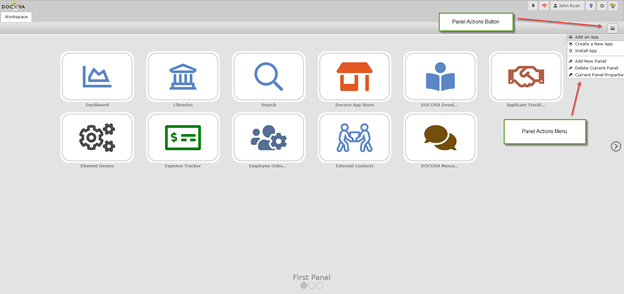
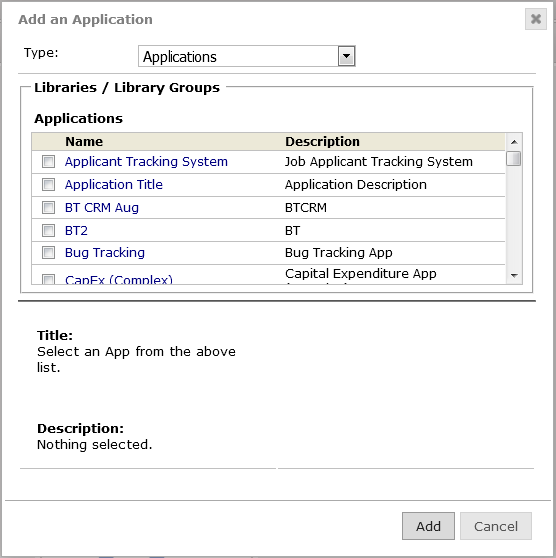
1.2.4. Panel Actions Button and MenuAt the top right of the Tiled Workspace is the Panel Actions Button. This button opens the Panel Actions Menu. The Panel Actions Menu has similar functionality to the Standard Workspace actions, with additional panel specific options. Figure 1.0 below shows the Panel Action Button and Menu. Read more information about the menu options below.
Figure 1.0 Panel Actions Menu The following details each of the menu items.
|
|||||||||||||||||||||||||
2. DOCOVA Applications |
|||||||||||||||||||||||||
DOCOVA application interfaces can be built in may different ways to meet different requirements.
Explore this topic’s sub-sections for more information on the basic usage of applications in DOCOVA.
The navigational and architectural models of a DOCOVA application can be very different between different applications, however, they all have design elements with similar functionality.
2.1. DOCOVA Application Architecture |
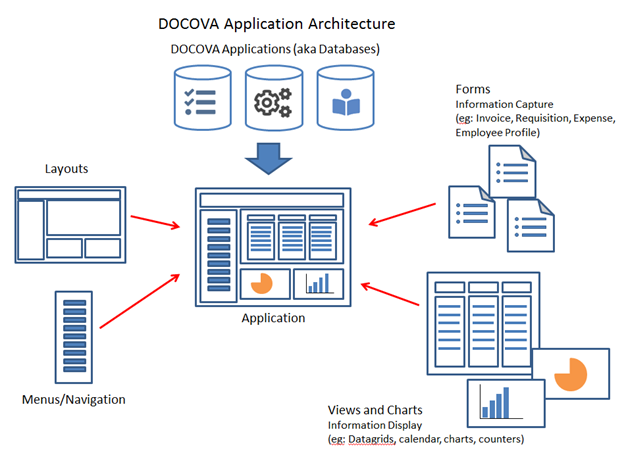
DOCOVA applications are made by creating and assembling different design elements that facilitate the capture, integration, dissemination and display of information.
Figure 1.0 below shows the basic design elements involved in creating a DOCOVA application. Sometimes, a DOCOVA application might be referred to as a "database".
The initial creation of an application starts with the layout. The layout is made up of panels where different design items are placed to create the the application. Applications can have several layouts depending on it’s requirements.
Applications also require some sort of navigation so that users can create and locate information. Often, navigation is in the form of menu design elements as can be seen in Figure 1.0.
Additionally, information is displayed through views, also known as data grids. DOCOVA’s view are very flexible and contain a lot of functionality. Data is also displayed through other means such as pie and bar charts or through calendars and counter boxes.
Information is typically captured in DOCOVA via forms. Forms capture content through design elements such as fields, rich text, images and file attachments. Examples of forms are Invoices, Quality Management Documents, Legal Documents, Purchase Requisitions, Policy Guidelines, Discussions and much more.
When information is entered into a Form, it is saved in a database as a record. These records are also called "Documents".
2.2. Application Functionality
DOCOVA applications are very flexible which allows them to be built in various ways. Hence, many applications that are built with DOCOVA may require some amount of user training depending on their functionality. However, each application will leverage the same design elements that are available in DOCOVA. This document discusses some of the common interface functionality a user is likely to experience with a typical DOCOVA application.
Figure 1.0 below shows a typical DOCOVA application when opened. Different aspects of the application are numbered. See information of the numbered items below the figure.
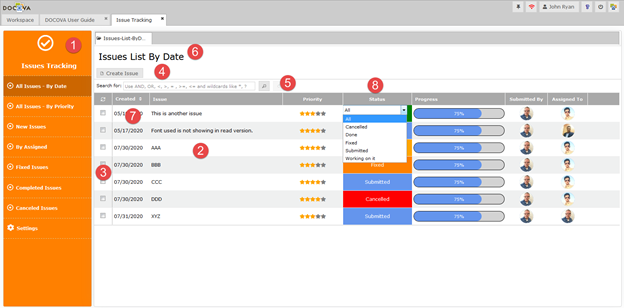
Figure 1.0
1) Menu for navigating content
Almost all applications will have some sort of navigation system. The most common way to do that is provide a menu will menu items that open and present the user with information or functionality. There are many available options for adding menus to applications in DOCOVA and DOCOVA applications are not limited to them. In the example in Figure 1.0 above, the menu on the left hand side has several menu items, each of which when clicked on will open an associated view of documents.
2) Views of documents
Views are the most prevalent way to view documents in DOCOVA. They are very powerful tools that help to depict information in different ways. As can be seen in Figure 1.0 above, the view can show document field information in different contexts and data types.
3) View selection margin
Views have the ability to show or hide a selection column. The selection column helps users to select documents in a view to perform custom actions on them or typical actions like copy and paste. See more information in the Right-Click Context Menu section below.
4) View action button bar
Many actions can be created for a view and associated with buttons which carry out the actions by clicking on the button. Typical actions in a View are actions like Create Document, for creating new documents using a certain form.
5) View search
If enabled, views have full text search capabilities where users can search the documents in a view. The search will search the text content in fields of documents as well as any file attachments that might be attached to the documents.
6) View title
If desired, a view title can be added at the top of a view. The title section can also accept html, hence view titles can be dynamic.
7) Column sort
If enabled, columns can be sortable. Columns that are sortable have the up/down arrows positioned on the right hand side of the column header. Clicking on the arrows will toggle the sort of the column as ascending or descending.
8) Column filters
Every view column is automatically also a built in filter for views. Just click on the right hand side of a column header and you will see a drop-down pane appear automatically with the consolidated values in that column available to be picked.
Selecting and Opening Documents In A View
To select a single document in a view, just click on the document. When you’ve clicked on a document, the row for the document will be highlighted so that you know what document was clicked on.
To select many documents in a view, use the left hand side selection margin. The margin contains a checkbox for each document in the view and one or many can be selected at a time.
To open a document from a view, double click on the document.
The document will then be opened into it’s own tab, or, the document will open into it’s own dialog depending on view options selected by the developer.
Figure 2.0 below shows an example of the typical case where a document that is double-clicked in a view opens into it’s own tab.
Figure 3.0 below shows a document being opened into a dialog from the view, which is a quick and easy option for views.
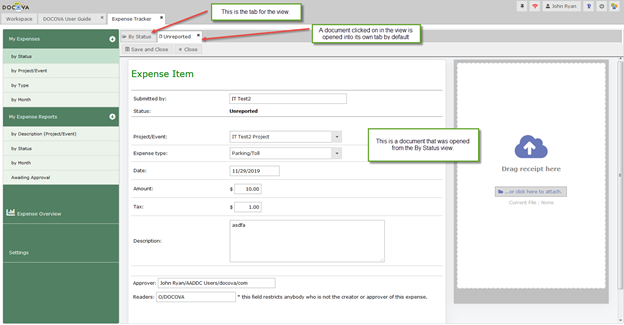
Figure 2.0
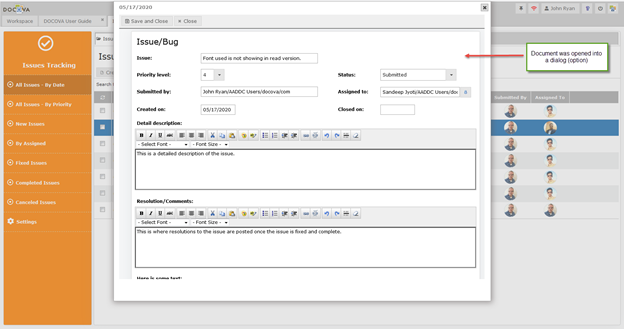
Figure 3.0
Right-Click Context Menu
When in a View, you can right click on any document to bring up the Rick-Click Context Menu. Figure 4.0 below shows the menu. See the table below for more information on the menu options.
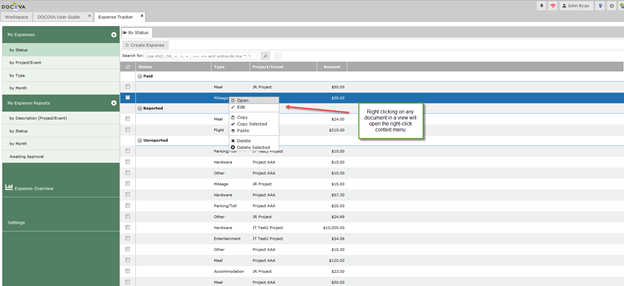
Figure 4.0
Right-Click Context Menu Options
|
Open |
Opens the currently selected document in the view. |
|
Edit |
Opens the currently selected document in the view into edit mode. When opening a document in DOCOVA, the document has two modes, read mode and edit mode. By default documents that are opened are opened in read mode, but this options allows the user to quickly get to edit mode right from the view. |
|
Copy |
This option copies the current selected document. |
|
Copy Selected |
This option copies all of the documents that have been selected by checking the their checkboxes in the selection margin. |
|
Paste |
This option will paste any copied documents. |
|
Delete |
This option will delete the currently selected document. |
|
Delete Selected |
This option deletes all of the documents that have been selected by checking the their checkboxes in the selection margin. |
Editing Documents
Once a document is opened or created from a view in DOCOVA, you can now edit the information in that document.
Editing a document in DOCOVA consists of interacting with the field types and functionality of the form used to create, update and store the information.
Once finished updating the fields in a document, click on the available save actions for the form. This is typically the Save and Close button in the action button bar of a form.
2.3. Access Control
DOCOVA offers many layers of secure access control at the
architectural level and the user level, as well as many directory integration
possibilities.
System and application security are crucial components to a low-code solution
and DOCOVA makes it easy to understand and easy to implement so that IT pro
developers and citizen developers alike, can manage this important feature.
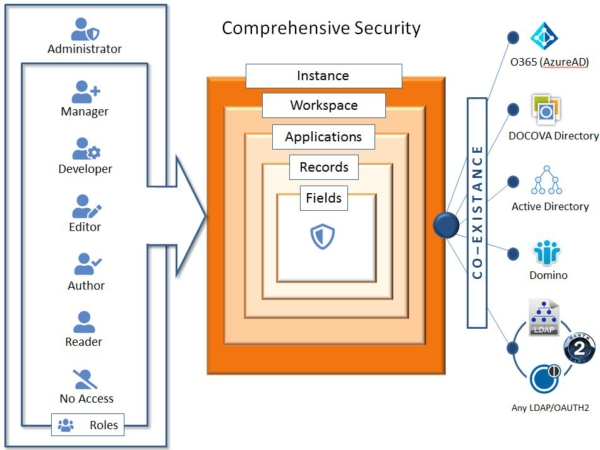
Figure 1.0
DOCOVA has several types of access control that can be applied in applications to shape the way users interact with design and information.
The following table provides more information on the types of access.
|
Access Type |
Description |
|
Administrators |
Administrators control the global settings of a DOCOVA instance, add users and assign citizen developers. |
|
Managers |
Managers can change anything about an application including access control and design. |
|
Developers |
Developers can create and change the design of an application. IT can control who are citizen developers. |
|
Editors |
Editors can add, modify and delete their own content and the content of other users in an application. |
|
Authors |
Authors are similar to Editors except they can only add, modify and delete their own content, but not the content of others unless given access. |
|
Readers |
Readers in an application can only read content. They can be set up to read all content or only specific content in an application. |
|
No Access |
User access can be restricted at all levels in DOCOVA, including the application, view/folder, document/record and field level. |
|
Roles |
Roles can be added to consolidate users and groups of users into specific roles that have particular rights in an application. |
2.4. Authentication Authority and Co-existance
Companies have many choices on how they can authenticate users with DOCOVA. DOCOVA has it’s own standalone Directory Services. This allows companies to manage users within DOCOVA, separate from any other authority. This can be leveraged for internal users or for external users.
DOCOVA also integrates with several other directory sources like Azure Active Directory (O365) providing users with a single sign-on experience. Other directories DOCOVA can be integrated with include, Active Directory, Windows Integrated Authentication, Domino Directory and other external sources like Okta.
Companies can configure DOCOVA to recognize several authentication sources simultaneously. This allows users from more than one authentication authority to access applications in DOCOVA, providing directory co-existance.
2.5. Changing an Application’s Design
Users can modify the design of an application if they have been given access to do so.
For more information about modifying the design of DOCOVA application, please refer to the DOCOVA Developer Guide.
To modify the design of an application, it must be opened in App Builder. App Builder is the interface for changing an application.
Start by clicking on the Application Menu of an application in the Workspace. Figure 1.0 below shows the menu option. By choosing this option, the App Builder will open and expand the current application that you are on.
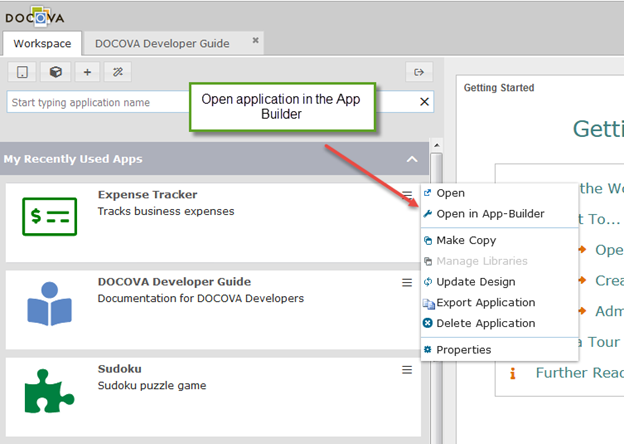
Figure 1.0
If using the Tiled Workspace when using DOCOVA, you can use the Application Menu which is found on the application tile itself by right clicking on the Application you want. Figure 2.0 below shows the menu option.
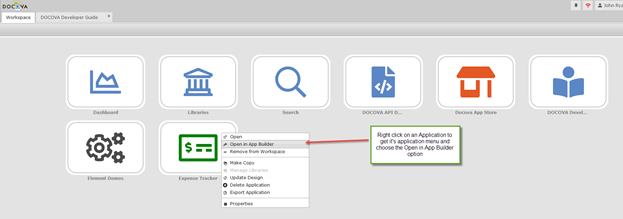
Figure 2.0
2.6. Creating an Application
Creating new applications in DOCOVA is easy. Follow the instructions below to create a new application.
This example is about creating a "custom" application, starting from the Standard Workspace. See below about creating a new application in the Tiled Workspace.
When you create your own application, you are automatically added to the application’s access control as Manager. This means you have full access to the applications you created.
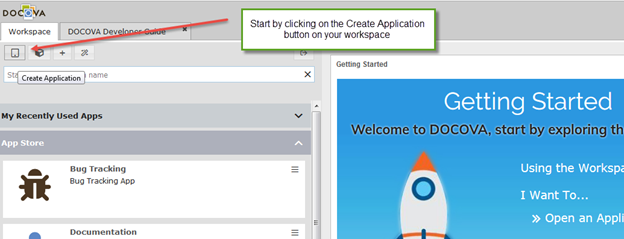
Creating an Application in the Standard Workspace
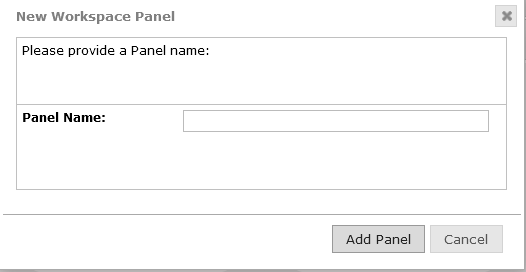
1) First, click on the Create Application button located at the top left of the Workspace.
2) Next, you will see a dialog which prompts you to provide a name for the application and a description of the application.
This is where you also choose an icon for the application and its color. The following image is what the dialog looks like.
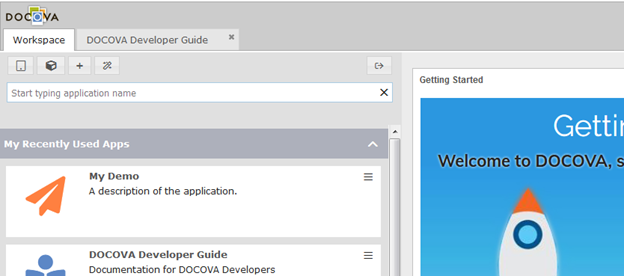
3) The application will automatically get created and will appear in the "My Recently Use Apps" section of your workspace. You will see the color icon that you selected and the description.
Click on the application to open it.
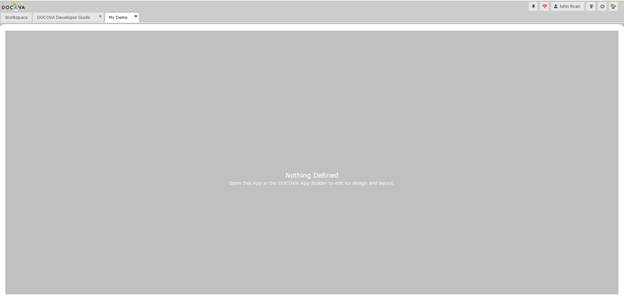
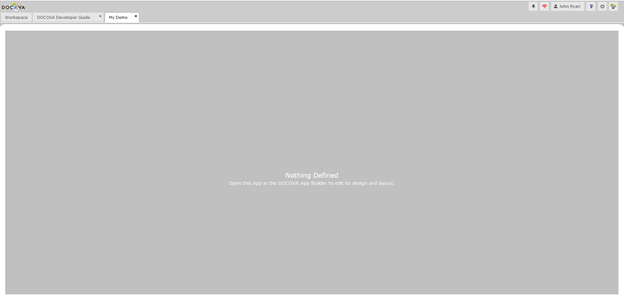
4) When the application opens into it’s own tab, you will see the following interface. This is what a new application looks like that has no design items in it.
Apps with no design elements yet show a splash screen that says "Nothing Defined" and "Open this App in the DOCOVA App Builder to edit its design and layout."
5) The next step is to open the application in the App Builder and edit its design. See the section called Create a Simple Application to create your first application within a few minutes.
Creating an Application in the Tiled Workspace
When creating a new application in the Tiled interface, it is the same process except the interface is a bit different. Here are the same steps as above, except in the Tiled interface.
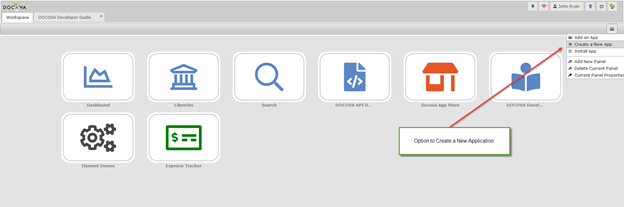
1) First, click on the Create a New App button located at the top right of the Tile Workspace.
2) Next, you will see a dialog which prompts you to provide a name for the application and a description of the application.
This is where you also choose an icon for the application and its color. The following image is what the dialog looks like.
3) The application will automatically get created and
will appear in the first open tile space on your workspace.
You will see the color icon that you selected and the description when you role
over the application tile.
Click on the application to open it.
4) When the application opens into it’s own tab, you will see the following interface. This is what a new application looks like that has no design items in it.
Apps with no design elements yet show a splash screen that says "Nothing Defined" and "Open this App in the DOCOVA App Builder to edit its design and layout."
5) The next step is to open the application in the App Builder and edit its design. See the section called Create a Simple Application to create your first application within a few minutes.
3. DOCOVA Libraries
3.1. DOCOVA Libraries System Application
Libraries are a special type of application in DOCOVA.
When you click on the Libraries System Application a new application tab will
open and a list of libraries will appear along the left of the screen.
Libraries contain content that is organized using Folders and Sub
Folders. The content is contained in documents and displayed through
Document Types. These documents are organized in Folder Views, also
referred to as Perspectives.
While in the Libraries Application on the far left of the interface you will
see a Folder Control. This is similar in appearance to what you are used to
seeing with the file system on your computer. Libraries that you have
access to will be shown in bold, and you can expand them to see content stored
in Folders and Sub-folders using the + and – symbols.
3.2. Subscribing to Libraries
To see Libraries displayed in the Folder Control on the left you have to Subscribe to them. Having access to a library doesn’t automatically show it. It simply means you can subscribe to the library to use it. To Subscribe or Unsubscribe to a library click on the home button at the top of the folder control. A dialog will appear that will allow you to add and remove libraries that you have access to.
Figure 1.0 below shows the Subscription dialog box. When clicking on the home button, the dialog is launched open. I can select one or many Available Libraries and then click the Add button to add them to the list of libraries that I am subscribed to. In the Libraries app, I can see ALL of the libraries I am subscribed to at once in the left hand Folder Control.
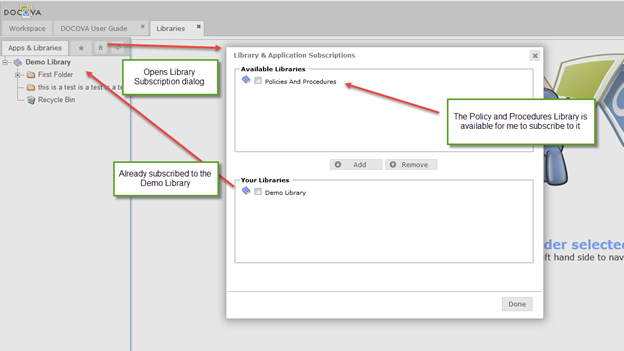
Figure 1.0
3.3. Managing an Individual Library
You don’t have to open the Library system application in order to access libraries. In the Libraries application you will see ALL of the libraries that you are subscribed to. However, you can also treat a Library as if it was like a single application. Figure 2.0 below shows a single library in the Workspace Applications Pane. When you click on the Library, it will open up in the Library application layout, but only this single library will be shown in the Folder Control. See Figure 3.0 below.
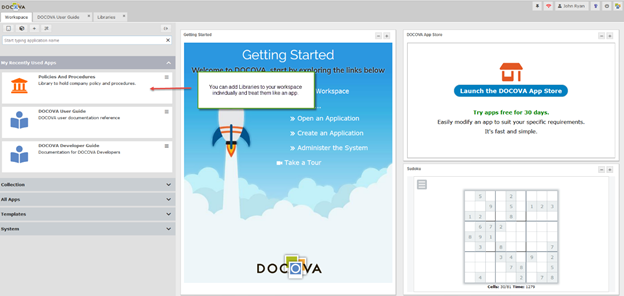
Figure 2.0
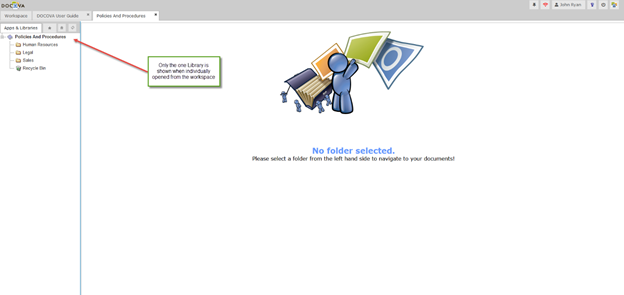
Figure 3.0
3.4. Library Groups
You can also access libraries as part of a Library Group. A Library Group is a user defined collection of applications. You create a Library Group as if you were creating an application.
When you’ve created a Library Group, you add or remove Libraries to/from it by using the Manage Libraries menu option.
Figure 4.0 below shows a Library Group called Library Group Demo that was created. When clicking on the Manage Libraries menu option, we added the Policies and Procedures library to it, PLUS, we added the Demo Library library.
When opening the Library Group it opens the Library App interface with all the Libraries of the group only. See Figure 5.0 below.
This is convenient when you are dealing with several Libraries that are related somehow, like part of a specific project without cluttering up your Library App with every library that you are subscribed to.
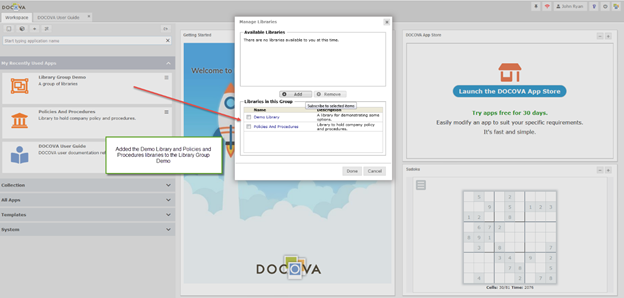
Figure 4.0
Figure 5.0 below shows the Library App opening only the Libraries that are a part of the Library Group that was created.
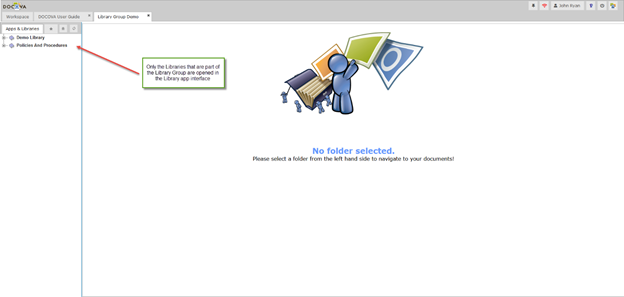
Figure 5.0
3.5. Working with Folders and Sub-folders
As mentioned before, DOCOVA Libraries are in some ways similar to your
computer’s file system. The Folder Control includes a hierarchy of
Libraries, Folders and Sub-folders. You can expand or collapse the
Folder/Sub-folder hierarchy by clicking on the “+” and “-” signs.
If you click on a Library itself you will see a History of what has happened in
that Library.
Depending upon the rights that have been granted to you, you may be able to
create and manage Folders and Sub-folders. If you Right Click on a
folder or sub-folder, a context sensitive menu will appear. This will
list all of the options.
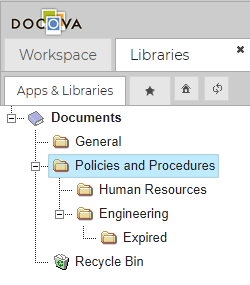
Figure 6.0
To add a new folder, right click and select New Folder from
the menu that appears. Add the folder name and click OK to save the
folder. If the folder you are creating is a Sub-folder, it will Inherit
the characteristics of the selected Parent Folder when the Sub-folder is
created.
Note that the Administrator will determine who can create Folders and
Sub-folders in a library. You will see a notification if you do not have
the rights to perform certain operations.
3.6. Creating Documents
To Create a Document in DOCOVA from the browser click on the New Document button located to the top left of the content pane. If only one document type is allowed in the folder the name of that DocType will appear on the button. If more than one document type is allowed then a dialog will appear after you click on New Document that allows you to select the type of document you would like to create.

Figure 7.0
After selecting the DocType you can enter content. A DocType can be configured with a wide variety of features, including the ability to Upload a File Attachment. After you have added your information to the document, if you select Save & Close the document will be created and saved in a DRAFT state. Unless the Administrator has made a change to the folder security, only you will be able to see that document if it is in the draft state. If you select Release Document, it will be released on the system for other users to access. (Note that the exact functionality of your documents may differ from above depending on the settings in the DocType)
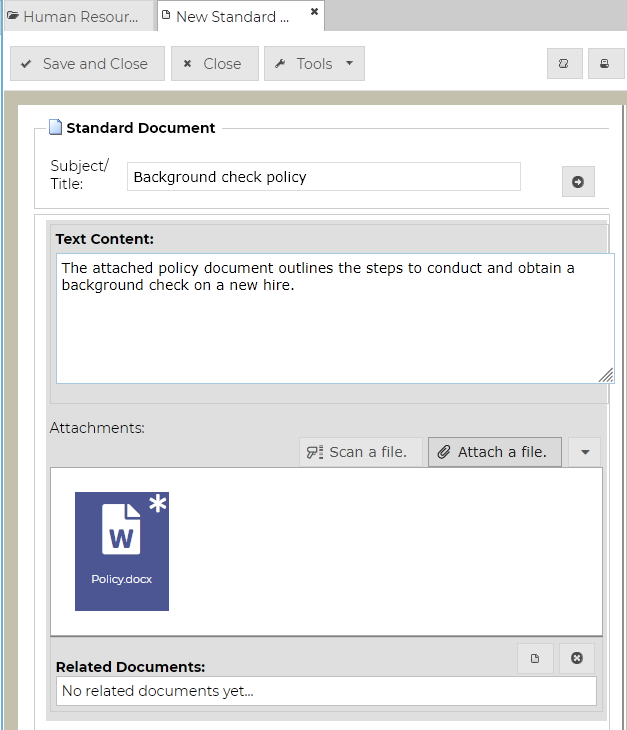
Figure 8.0
If the document has Workflow associated with it you will see
a Start Workflow button. The Release button will appear
again once the document has gone through its workflow process.
To create several documents at the same time you have a few options:
- Use the Tools/Import Files option (requires the DOE Plugin)
- Drag and Drop Files & Emails to DOCOVA Explorer (requires the DOE Plugin)
- Drag and Drop Files & Emails to a Folder in the Folder Control, or to the perspective area of an open Folder.
- Drag and Drop Files to DOCOVA using WebDAV (requires File Jockey)
To use the Tools/Import Files option navigate to the Library/Folder/Sub-folder where you wish to create your documents. Select Import Files from the Tools Menu as shown in Figure 9.0.
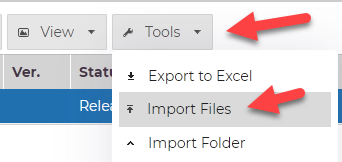
Figure 9.0
A dialog will appear that will allow you to locate your files from the file system. You must select Add Files to select the files from your file system, select the Document Type you wish to use to import the files, then click on the Finish button.
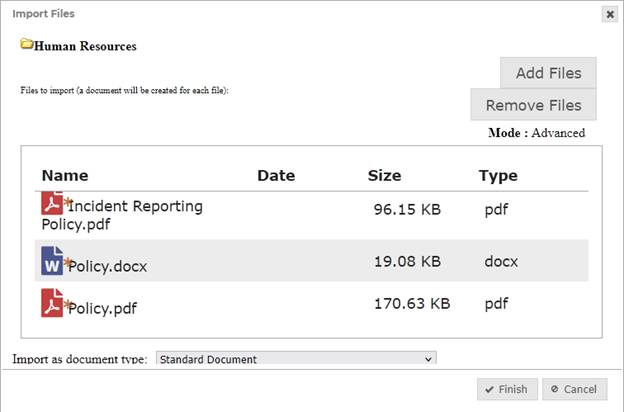
Figure 10.0
You can also create documents by dragging and dropping files into DOCOVA Explorer (DOE). First ensure you have the DOCOVA Plugin (DOE) Running. If DOE is NOT running the DOE Icon located at the top right of your workspace will be RED, and you will need to either start DOE from the Windows Start menu, or if you do not have DOE installed download and install it from the DOCOVA About Icon button. Depending upon the access your have to your computer, you may need assistance from your system administrator to do this.
![]()
To create a new document Open DOE and then navigate to your
file system in Windows Explorer. Select the files you want to import and
then drag and drop them onto the Folder in DOCOVA where you want them to be
created. Note that you cannot drag and drop entire folders, only
files. If you want to import a folder structure you can do that
using the perspective Tools – Import Folder menu option, or the Folder Control
Import Folder option.
To Drag and Drop an Email into DOCOVA navigate to the folder in your email
client that has the email. Drag and drop the email to the target DOCOVA
browser folder or a folder in the DOE client. You may be prompted to select the
document type or not, depending on the available DocTypes for that folder. Note
that some email clients require additional plug-ins to support drag and drop.
3.7. Editing Documents
To edit a document double click on the document in the folder view, then click
on the Edit action button from the menu at the top of the
document. Alternatively, you can right click on the button in the folder
view and select Edit from the menu that appears. If you do not see
an edit button then you do not have the required access to perform that
operation.
3.8. Document Security
As the creator of a document you are considered the Document
Owner, unless some form of customization has changed
that. It is therefore up to you to determine who else can read or edit
that document. To do this, open the document and expand the More Section by
clicking this button ![]() which is located at the
far right of the document.
which is located at the
far right of the document.
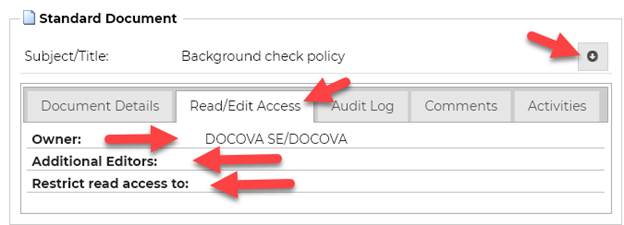
Figure 11.0
If you allow other users to Read or Edit a document that you own, but they cannot see it when they go into DOCOVA. This may be because of the state of the document and/or the settings in the Folder and DocType. Contact your system administrator if you require assistance.
3.9. Folder View Perspectives
A Folder View allows users to look at several documents at
one time by displaying them in a type of table layout. Columns pull information
from documents so you can determine what they are without having to open
them. For example, if working with legal documents, it may be
advantageous to create perspectives so you can look at them by the Client
Number, by the Matter Number, or by other types of Meta Data that exist on the
Document Type. Folder Views are also known as Perspectives, and can be
easily adjusted by a user to meet their needs.
Before you begin, ensure that the View Options Toolbar is turned on. You
can do this by clicking the View Options item from the View pull-down
menu. See Figure 12.0 below.
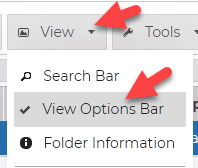
Figure 12.0
Every folder has a default System Perspective that will appear unless another has been setup. Users can change this default perspective to another one by clicking on the Perspectives drop-down field showing at the top of a view. See Figure 13.0 below. Administrators can create new perspectives that are available to all users and save them into the list.
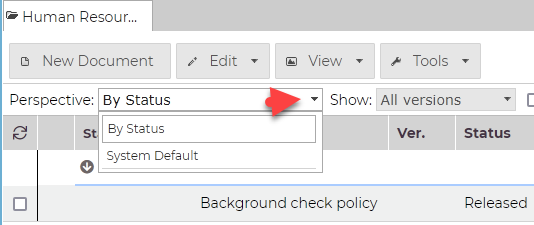
Figure 13.0
A New Perspective can be created by right clicking on the column headings and adding or removing columns, changing the column properties, or categorizing and sorting. If you have rights to do so, you can then select Tools – Save the New Perspective.
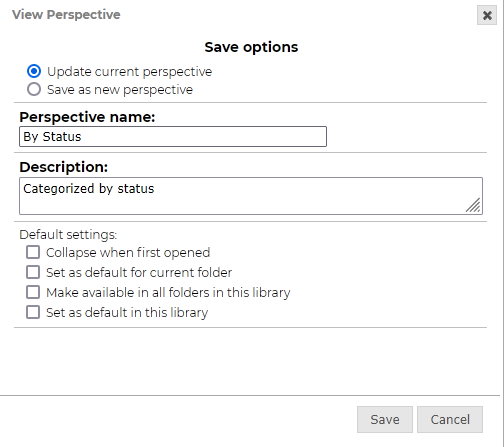
Figure 14.0
If as a user you define a new perspective keep in mind that when you navigate away from a folder and then return to it your changes will be lost. Only Administrators can save a perspective for others to use.
4. DOCOVA Mobile Application
The DOCOVA mobile application is a hybrid application for smartphones.
Installing this application on your phone allows your organization to then develop applications in DOCOVA and use them via the DOCOVA mobile app. There is no need to deploy applications to the Apple or Google Play stores. The DOCOVA mobile app is all that is needed for you to deploy as many mobile DOCOVA apps as you want.
Deployment and upgrading DOCOVA mobile applications is instant.
Running DOCOVA on a desktop/notebook computer or tablet uses the same responsive interface. The DOCOVA mobile application is just for smartphone use.
4.1. Mobilize Legacy Systems
Additionally, with DOCOVA’s integration capabilities, organizations can build mobile applications in DOCOVA that use information coming from legacy systems so that now you can expose any legacy systems that you have to modern mobile technology.
4.2. Mobile Workspace Style
The DOCOVA Mobile Workspace has two workspaces you can choose from. This is similar to the workspace choices on your notebook/desktop computer.
You can choose to use the Standard Mobile Workspace which is a listing just like the left hand side application listing found in the notebook/desktop Standard Workspace.
Or, you can use the Tiled Mobile Workspace, which looks similar to the notebook/desktop Tiled Workspace and is also similar to the way applications are presented on smart phones.
Figure 1.0 below shows the a depiction of who the Standard and Tiled mobile workspace look.
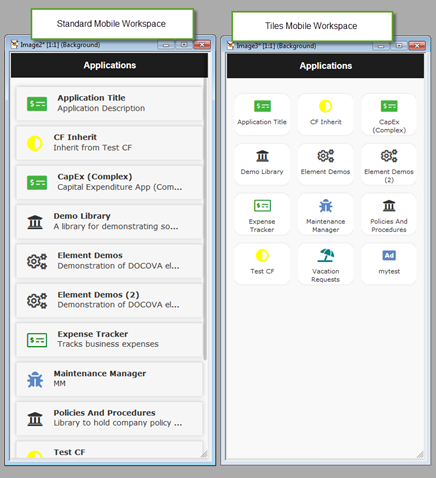
Figure 1.0
4.3. Changing Your Mobile Workspace Style
To change your mobile workspace style, you change it in your User Profile on the User Experience tab.
Figure 2.0 below shows the Mobile Workspace Style setting in the User Profile.
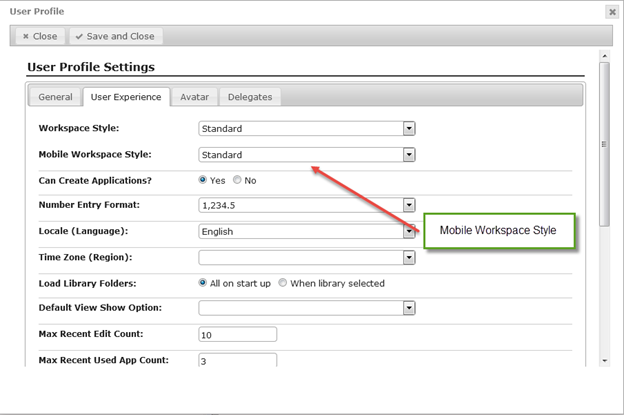
Figure 2.0
4.4. Exposing DOCOVA Applications for Mobile
Make an application available to the mobile interface by setting the Mobile Launch Settings in the Application Properties General Settings.
Figure 3.0 below illustrates modifying this setting. Only when the setting is used does the application appear in the mobile app.
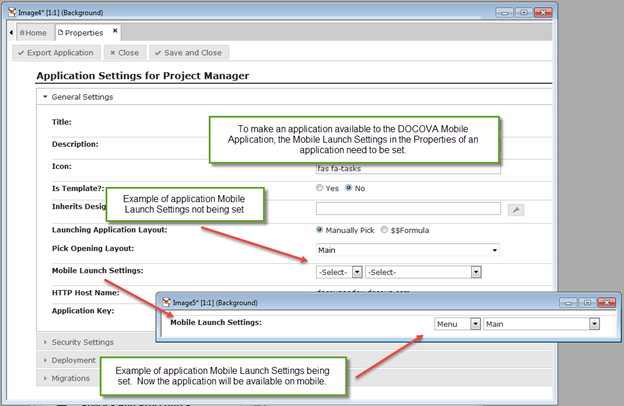
Figure 3.0
5. The DOCOVA Plug-in and Windows Integration
For Windows users, DOCOVA provides the (optional) DOCOVA Explorer Plug-in (DOE). DOE enables DOCOVA to have a deeper integration with a users Windows environment for managing files and integration with applications like MS Word and Excel. Depending on the types of applications an organization creates with DOCOVA, they may include DOE as part of the functionality.
The DOCOVA Explorer plug-in app is a small Windows application that allows users to interact with DOCOVA in different ways. It provides more advanced capabilities to DOCOVA such as interacting with files and integration with your Windows desktop applications like MS Word and MS Excel.
Users can download and install the DOCOVA plug-in by first clicking on the DOCOVA About button in the top right hand corner of the workspace. See Figure 1.0.
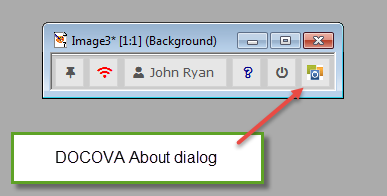
Figure 1.0.
Upon clicking the DOCOVA About button, the following dialog will appear (Figure 1.1). Click on the Download DOCOVA Plug-in button (64bit version recommended) to download and install DOE.
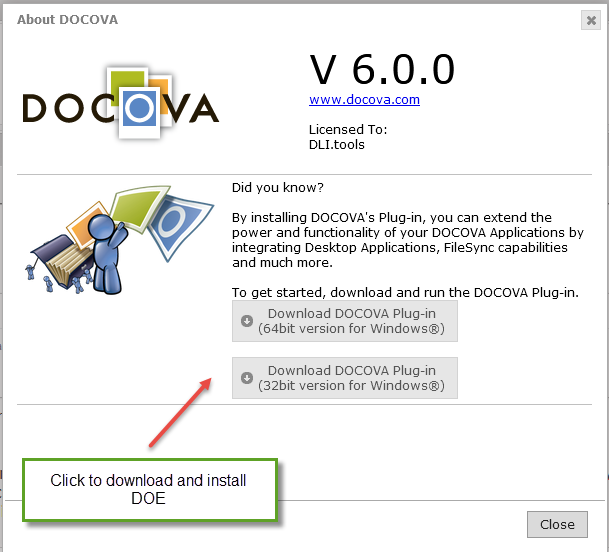
Figure 1.1
5.1. Connecting DOE to DOCOVA
After installation DOCOVA Explorer will be accessible from the Windows program listing. See Figure 2.0.
Figure 2.0
DOCOVA Explorer may be set to auto start when the computer first starts.
When DOCOVA Explorer is first launched/opened following installation it will prompt for a connection to the DOCOVA browser instance. See Figure 2.1.
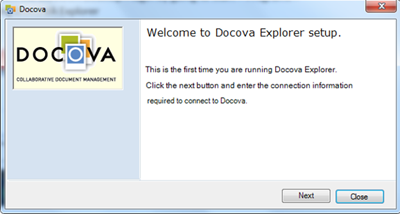
Figure 2.1
Click Next and in the subsequent dialog, enter the specific
url for your DOCOVA browser instance (the url can vary depending upon your
environment but should typically end in /index.php ), along with your username
(eg. [email protected]) and password. See Figure 2.2.
Select DOCOVA SE Edition option, and click Connect.
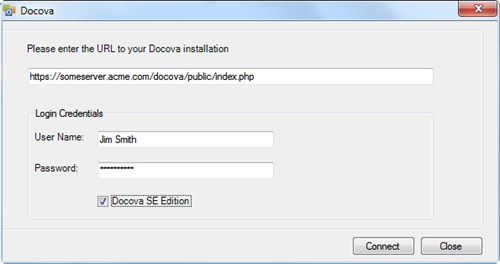
Figure 2.2
You should be presented with a dialog indicating that the connection was successful. If not, check the url, your user name and password against the connection details you use for the browser environment. See Figure 2.3.
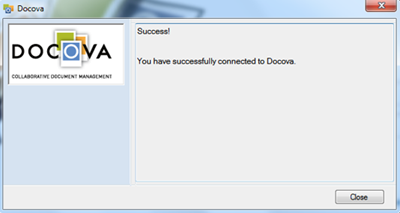
Figure 2.3
After installation, the DOCOVA Desktop Plugin should appear running in your Windows task bar, and be added to your Windows Startup folder so that it is loaded each time you start Windows. See Figure 2.4.
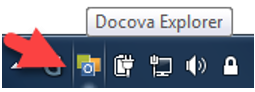
Figure 2.4
To test the connection between the DOCOVA Desktop Plugin and the DOCOVA browser interface, log in to your DOCOVA browser instance. In the upper right of the DOCOVA browser window look for the plugin status indicator. It should appear blue or green and if you click on the icon it should display a message indicating that the plugin is running. If it appears red or displays the message that the plugin is not running then there is a communication problem between the plugin and the browser. See Figure 2.5.

Figure 2.5
5.2. DOCOVA Explorer Features and Usage
5.2.1. File Attachments
When DOE is running, users can interact with files on a different level. For example, if a form in an application or library uses a file upload control element, with DOE running you can drag and drop one or many files into the control from your desktop. Also, users can "edit-in-place". This means you don’t have to detach a file, edit it and reattach it. With DOE running, users can edit a file right in DOCOVA, make their changes and save the file making it very easy to maintain files within DOCOVA.
5.2.2. Export to Excel
For applications where the feature has been added, the ability to export selected entries from a view or folder listing to Excel is available through DOE.
5.2.3. Application Integration
With DOE running, users can also interact with desktop applications like MS Word and Excel.
Figure 3.0 below shows how files in MS Word can be opened from DOCOVA libraries or saved to DOCOVA libraries from within Word via DOE’s add-in component. This functionality is also available in Excel.
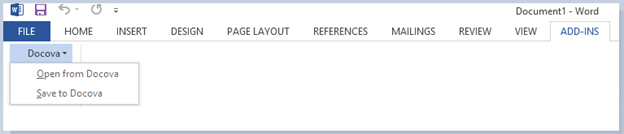
Figure 3.0
5.2.4. Library Integration
When opening DOE, users get access to their DOCOVA libraries without having to open DOCOVA in a browser. Figure 4.0 below shows the interface.
DOE allows users to interact with one or many instances of DOCOVA through DOE on their desktop. Users can view, edit, create and modify information in libraries from DOE, including dragging and dropping files into libraries too.

Figure 4.0
5.2.5. Windows Desktop Integration
A very powerful aspect of DOE, especially for developers, is the ability to integration DOCOVA application to the Windows desktop. Using DOCOVA’s API, developers can leverage DOE capabilities to integrate with almost any Windows application or the Windows file system. This makes DOE an extremely powerful tool to integrate with your DOCOVA applications.