DOCOVA Administration Guide
1.1.4. Application Integration
3.2.3. Workflow/Lifecycle Settings
1. System Settings |
System Settings for DOCOVA contains two sub-sections, Global Settings and HTML Resources.
The Global Settings options and properties cover the majority of system settings for a DOCOVA core instance while the HTML Resources first and foremost manage the platform logo and home page.
Review the Global Settings and HTML Resources for more detailed information.
1.1. Global Properties |
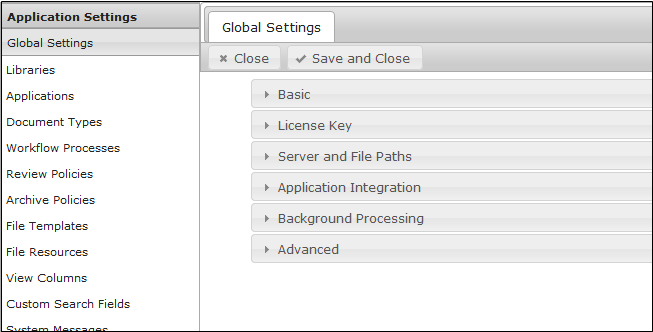
The core of a DOCOVA instance is its Global Settings. When in the DOCOVA Administration interface, Global Settings is the first option on the left hand side navigation menu.
When you click on Global Settings you will see it is made up of several sections; Basic, License Key, Server and File Paths, Application Integration, Background Processing and Advanced.
Please read more about each of these sections in their own content document under this Global Settings document.
1.1.1. Basic |
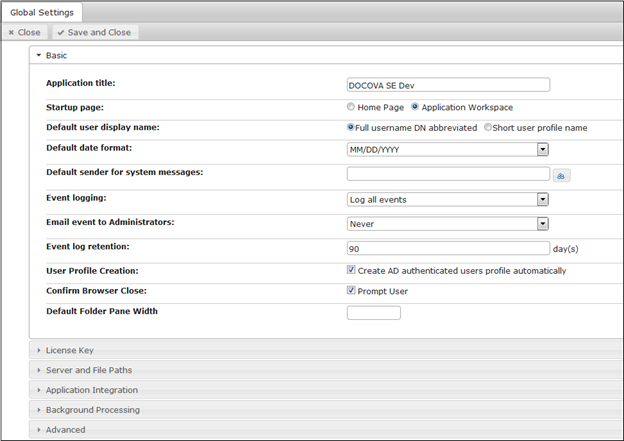
The Basic section of the Global Settings shown in the image below holds several system parameters that are explained below.
Application Title:
This field holds the name of the DOCOVA instance and helps Administrators identify instances. An organization might have several instances of DOCOVA for different divisions. For system operations, Administrators might assign titles like DOCOVA Development and DOCOVA Production to identify development and production environments.
Startup Page:
When initially opening DOCOVA, users will arrive at the default Standard Workspace. Users can further change that in their User Profile so that they come to either the Standard Workspace or to the Tiled Workspace whichever they prefer. However, Administrators can interject and force all users to see a startup page.
If the setting is set to Startup Page, the built-in default DOCOVA startup page will be used. It is simple and contains a button so users can then navigate onto their workspace.
Administrators can provide a customized HTML Startup Page so that when opening DOCOVA their own custom splash page is shown to users. In order to provide your own custom HTML Startup Page, go to the HTML Resources in Admin and pick Home Page from the Name dropdown option…add your HTML and save. This page will then show as the default when opening DOCOVA.
Default user display name:
This setting applies to Libraries only. It specifies whether to show the short user name (eg: John Smith) or full user name (eg: John Smith/Acme/Toronto) in folder perspectives and documents.
Default date format:
Different countries around the globe use different default date formats. For example, many European countries typically use dd/mm/yyyy while North America often uses mm/dd/yyyy. This option allows Administrators to set the system default display for dates. This means that when using dates in view columns, the dates will follow this format. You can of course, through the date field element and/or with $$formulas like $$FormatDate, format dates any way you desire.
Default sender for system messages:
When DOCOVA sends out system message or other messages like workflow related messages, those messages need a default sender. This field is used to set who the default sender will be. Typically this should be a name that people can readily identify with being the DOCOVA system, so that when they get a message they know where it is coming from. For example, DOCOVA Admin could be the entry. Additionally, the entry does not have to be from an address book, it can be any value.
Event logging:
Errors that occur in DOCOVA are captured in event logs, and can be a good place to look if an issue arises.
There are three event logging options for DOCOVA;
1) No Logging – Just as it says, no logs are tracked. The benefit of this option is that there is no performance hit on logging from a CPU and storage perspective.
2) Log critical events – This option will log only critical events. The benefit of this option is that the most important events are logged while still being efficient in terms of performance overhead.
3) Log all events – This is the default setting. It will log all events that are tracked by DOCOVA which will include critical events, warnings and informational style events.
Email event to Administrators:
When events are logged, Administrators can have event messages emailed to them. There are three options:
1) Never – Never email that an event was logged.
2) On critical errors only – Send emails when critical errors occur.
3) On all events – Send emails on all event types, which are warnings and critical errors.
Event log retention:
When event logging is in use, this field allows Administrators to define how long to retain the logs. The default is 90 days.
User Profile Creation:
This option is a checkbox called ‘Create AD authenticated profile automatically”. With this option, if DOCOVA is configured to perform user authentication against an Active Directory directory, a User Profile will automatically be created when users log into DOCOVA.
Confirm Browser Close:
If Prompt User is enabled, a ‘Leave Site? Changes you made may not be saved.’ dialog will appear when users are closing their browser (if DOCOVA is loaded) or navigating away from DOCOVA. This is a safeguard to remind users they will lose entered data if it has not been saved.
Default Folder Pane Width:
For DOCOVA Libraries, use this option to configure the width of the left side pane as needed. (the folder listing)
1.1.2. License Key |
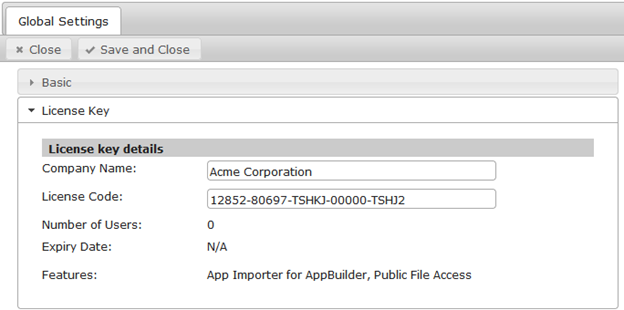
The License Key section holds the DOCOVA License key.
Encoded in the license key are various details such as the company name, the number of users, the expiry date of the license key and other licensed add on features. (App Importer, Public File Access, etc)
1.1.3. Server and File Paths |
The Server and File Paths section provides options for defining information about the DOCOVA instance that is used by other functionalities of the platform.
The following image shows the Server and File Paths section in the Global Settings. The options are detailed below.
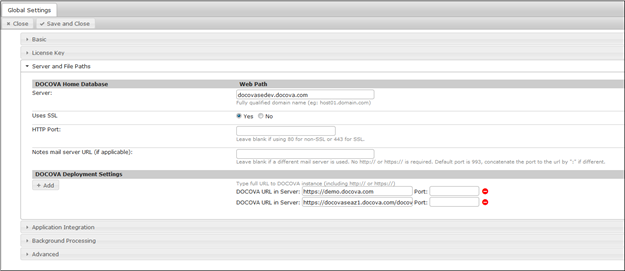
Server: This option defines the fully qualified domain name of the current instance of DOCOVA.
Uses SSL: This option defines whether or not this instance uses SSL or not. The default is Yes because the vast majority of instances use the SSL protocol.
HTTP Port: This field defines which HTTP port is being used by this instance. If left blank, port 80 or port 443 are used depending on if SSL is being used or not. If your organization uses a different port then you can enter that here.
Notes mail server URL (if applicable): This option defines the URL used by a Notes/Domino mail server and is reserved for DOCOVA running on a Domino platform.
DOCOVA Deployment Settings
The DOCOVA deployment settings is where an organization can define the protocols, fully qualified domains and ports of other DOCOVA instances.
This is used in functions by applications. For example, when applications are deployed and “pushed” to other servers. See the Deployment section of an application’s Properties in the DOCOVA Development Guide.
1.1.4. Application Integration |
The Application Integration section of the Global Settings, provides options for indexing and attachment handling.
The following image shows the Application Integration section. It has two sections, Domain Index Integration and Attachment Handling. More detail about each of the options listed below.
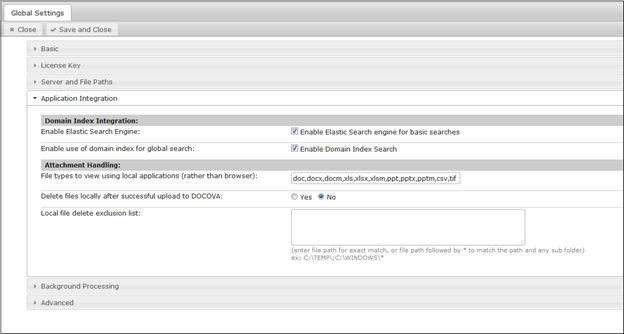
Enable Elastic Search Engine:
Administrators can enable this option by clicking on its corresponding checkbox. By default, this option is enabled and ensures DOCOVA will full-text index all of the content of Applications and Libraries in DOCOVA.
Basic searches, that is, searches performed using the Search field rather than the Advanced Search dialog, allow you to search across all field content but also across all file attachment content too. That means if what you are searching for is contained in a document in DOCOVA or in a MS Word file attached to a DOCOVA document, DOCOVA can find it.
Note that this option applies to the entire DOCOVA instance, and NOT a particular application.
Enable use of domain index for global search:
Enabling this option allows for Domain Index search, which is the ability to search across multiple DOCOVA domains at once.
File types to view using local applications (rather than browser):
For this option, enter in all of the file extensions for files that should be opened by their corresponding applications versus a user’s browser.
In DOCOVA Libraries and applications, in many cases the ability to attach files into documents/records within a Library or Application is used. When a user tries to open and read an attached file, by default, the user’s browser will attempt to open and show that file to the user. Modern day browsers can only do this for a handful of different file types. In some cases, organizations will want to open files like MS Word (docx) with MS Word rather than open it in a browser. This option provides that capability.
Delete files locally after successful upload to DOCOVA:
This option is set to “No” by default.
When attaching files to documents in DOCOVA, users are typically attaching the file from the directory structure or hard drive of their computer. When a file is attached, it can be optionally automatically deleted from the hard drive. The reason for this is to help eliminate duplication of a file so that a file is not attached into an application in DOCOVA, while still residing on a user’s computer. DOCOVA provides users with the ability to edit files in place, meaning they don’t have to download a file in order to edit it and then re-upload the file after they are done editing. Hence, when used with the deep functionality of DOCOVA, this option provides efficient and useful management around file editing.
Local file delete exclusion list:
This option allows Administrators to specify one or more directories that will be excluded from deleting any files.
1.1.5. Background Processing |
The Background Processing section of the Global Settings allows for configuration of the time scheduled processes will run in the DOCOVA environment.
The following image is how the section appears in the Global Settings. Read below for more information about each option.
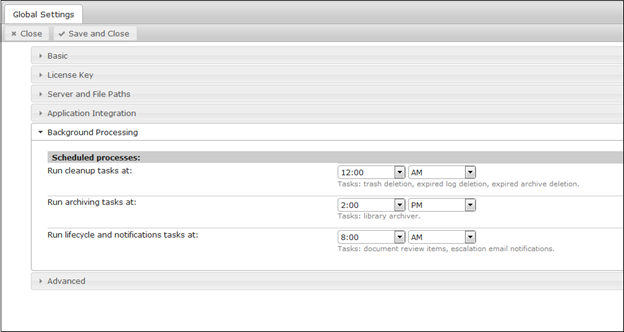
Even though these tasks can be set to run on any hour throughout the day or night, it is suggested that these processes be scheduled at times when the DOCOVA system is being used the least amount. For example, a good time to run cleanup tasks might be at 4 AM because there probably won’t be any users on the system at that time. These processes are not overly CPU intensive in and of themselves, however, running them when the system is not being utilized is more efficient.
Run cleanup tasks at:
This task is responsible for deleting items like documents that have been marked for deletion, expired log records and expired archive records. This task can be set to run at any hour of the day or night.
Run archiving tasks at:
This task will archive all documents slated to be archived at the time. This task can be set to run at any hour of the day or night.
Run lifecycle and notifications tasks at:
This task sends out notifications around workflow items like Reviews and escalation emails. This task can be set to run at any hour of the day or night.
1.1.6. Advanced |
The Advanced section appears as shown in Figure 1.0 below and contains the following options, which are explained in more detail below.
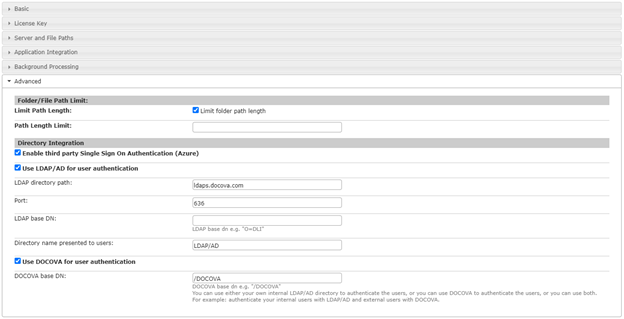
Figure 1.0
Folder/File Path Limit
Limit Path Length: Enable this option and set the Path Length Limit on Library folder names. This option may be required if the folders are being exported to or synchronized with local folders, as Windows has limits to the folder and file name lengths it supports. See https://docs.microsoft.com/en-us/windows/win32/fileio/naming-a-file?redirectedfrom=MSDN for additional information.
Path Length Limit: Used in conjunction with the Limit Path Length option to set the maximum path length.
Directory Integration
Enable third party Single Sign On Authentication (Azure):
DOCOVA can be optionally configured to authenticate using Office 365 via Single Sign On. In order to enable single sign on with Office 365, LDAP must be configured for the Office 365/Azure instance, as LDAP is utilized to obtain additional user and group information as part of new user registrations. For detailed setup information, please refer to the DOCOVA SE Installation Instructions guide.
Use LDAP/AD for user authentication:
Enable this option to authenticate with an LDAP enabled directory (eg. Active Directory). You must ensure that the LDAP user name (ldap_username) and password (ldap_password) values are configured in the parameters.yml file. The LDAP password should be entered surrounded by double quotes.
If changes were made to the parameters.yml file be sure to clear the application cache on the server.
LDAP Directory Path: Enter the LDAP server hostname
Port: For secure LDAP (SSL) choose port 636. Otherwise enter port 389.
LDAP base DN: Configure the LDAP base DN. (eg. DC=corp,DC=ad,DC=acme,DC=com ) or leave blank to return the full directory.
Directory name presented to users: Configure a descriptive name for the LDAP/AD directory (eg. Acme Directory)
Use DOCOVA for user authentication:
DOCOVA has it’s own directory that can be used to manage users, either on it’s own or along with an LDAP directory. Enable this option to use the DOCOVA Directory for user authentication.
DOCOVA base DN: Configure the base DN to use. eg: /DOCOVA
1.2. HTML Resources |
HTML Resources can be used to customize the DOCOVA User Interface. The available options are described below.
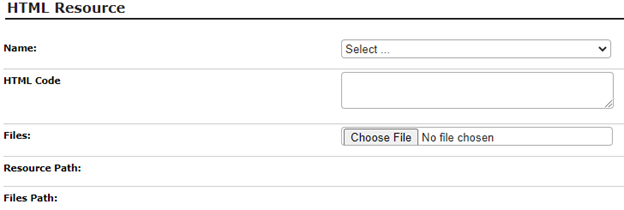
Name: Select either ApplicationLogo or Home Page. Selecting ApplicationLogo will override the default DOCOVA logo in the top left corner of the DOCOVA interface. Selecting Home Page allows you to create a custom landing/splash page that users will see when they first login to DOCOVA. Note that you must also set the Startup Page to Home Page in the Global Settings – Basic tab, in order for your Home Page to be shown. Important: The Home Page HTML Code must include a button or link for users to click to take them to the /docova/web/app.php/Docova/HomeFrame.
HTML Code: This field can be used to add additional information to the selected item. For example, if ApplicationLogo is selected, HTML can be added to control the size or appearance of the image. For example: <img src=”/docova/web/app.php/Docova/HTMLResource/MyCompanyLogo.png” width=100>. Note that if ApplicationLogo is selected and a File is attached, DOCOVA will auto size the image to fit in the top left corner. Adding HTML Code is optional.
Files: Click ‘Choose File’ to select the image to be used.
Resource Path: This is informational only.
Files Path: This field will show after the HTML Resource is saved and re-opened. It will show the path to the attached File, which can be used in the HTML Code field to manually set the image src.
2. Applications |
The functionality, design and purpose of a DOCOVA application is only limited by the imagination of a developer.
Usually a new application starts with an idea. A way to do something better, faster and more efficiently within your company or department. What information needs to be captured? What business processes need to be followed? How do you want to interact with the information?
For most users, an application is a part of their job, something that supports a task they need to complete. For administrators, there are the additional considerations of security, email or third party integration support, and possibly design.
This section discusses the administrators options available via the Admin app.
2.1. Application List |
When the Application List Admin menu option is selected, a list of the applications in the DOCOVA environment are displayed. Opening one of these records displays the Application Settings as shown in Figure 1.0 below.
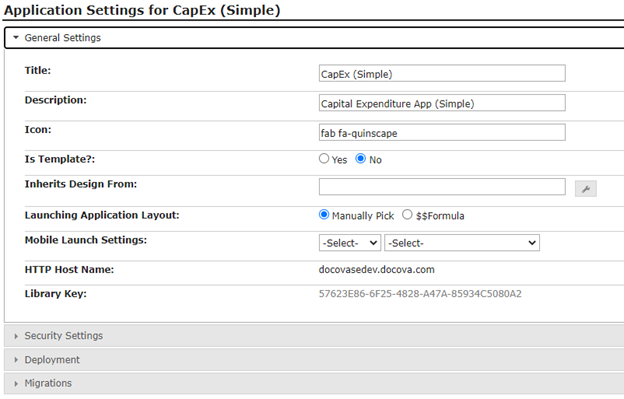
Figure 1.0
Each of the sections in the Application Settings is discussed in corresponding sub-sections under this document.
2.1.1. General Settings |
The General Settings include the following:
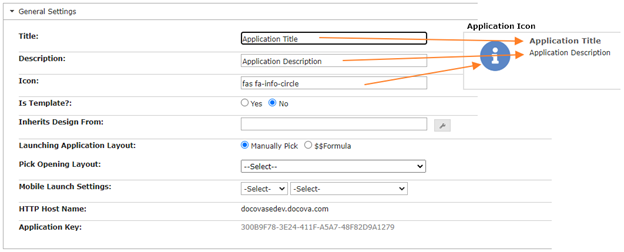
Title: The name of the application to be displayed with the application icon.
Description: A short description of the application displayed with the application icon.
Icon: The graphic image to display with the application icon.
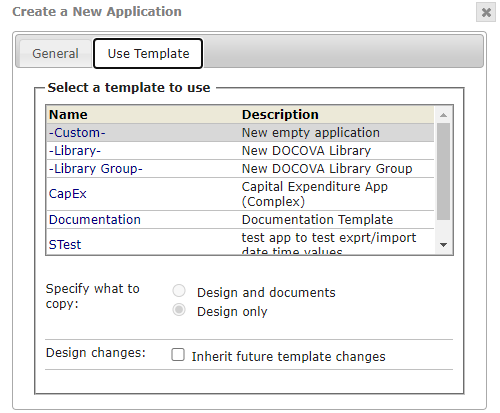
Is Template?: When a new application is created, it can either be blank (no design elements) or it can be created from a template, meaning it will inherit all the design elements that are in the that template. Use the ‘Is Template?’ option to control which applications are available as templates when Create Application is selected.
Inherits Design From: Use this option to specify an application template that the application should inherit design elements from when the application icon pull down menu option, Update Design, is selected.
Launching Application Layout: Use this option to specify the layout that is to be loaded when the application is opened in a web browser. This can either be the manual selection of a layout, or a formula that computes the name of an existing layout. For example, to display a different layout based on a user’s role.
Mobile Launch Settings: Use this option to configure which listing is first presented when a user opens the application in the DOCOVA iOS/Android application (in place of the Layout which would be launched in a browser).
HTTP Host Name: Displays the domain of the DOCOVA server the application is on. Read only.
Library Key: Displays the unique identifier of the application. Read only.
2.1.2. Security Settings |
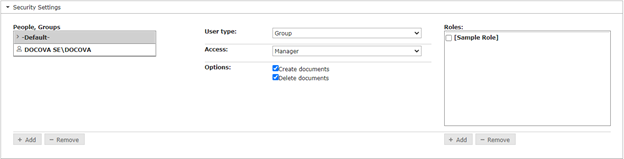
Security Settings are used to manage access to an application. For each person or group selected in the ‘People, Groups’ box, the current access rights are shown. These can be changed in the User type, Access, Options and Roles areas.
People, Groups: To add a new user, click the + Add button. To remove a user, select the user to remove, then click the – Remove button. Note that when adding a user, the rights of the selected person or group are inherited by the new user.
User type: Options are Group or Person.
Access: Options are Manager, Designer, Editor, Author, Reader and No Access. The following points describe these access levels, however it is important to note that the design of the application may further restrict or provide rights by way of Authors and Readers fields. The Options to Create or Delete documents obviously have an impact as well.
- A Manager has full access to the application, including the design and security settings.
- A Designer has full access to the application and can view edit the application design.
- An Editor can view and edit any document in the application.
- An Author can view all documents, but can only edit the documents they create, or document where they are listed in an Authors field.
- A Reader can view all documents in the application only.
- No Access specifies that the user or group may not access the application at all.
Options: Enable or disable the ability for the selected Person or Group to Create and/or Delete documents. These options are not available if Access is Reader or No Access.
Roles: A developer can assign special access to design elements and application functions by creating roles. Roles are similar to groups, however, unlike groups, roles are specific to the application in which they are created. Roles can be used in application design elements to manage access to those elements. For example, you may want to restrict certain menu options to ‘Admins’ and others to ‘Users’. By creating and assigning these roles and linking them to the applicable menu options, this can be achieved. For example, to restrict a menu option to the [Admin] role, add $$IsNotMember(“[Admin]”, $$UserRoles) as a Custom formula in the menu option Hide/Show settings.
2.1.3. Deployment |

The Deployment section is used to push design updates for the given application from one DOCOVA instance to another. For example, to push updates from a Development instance to a QA or Production instance.
Note that instances must be defined in the Global Properties – Server and File Paths section in order for them to be available here.
2.1.4. Migrations |

The migration section is used to import the application design and data from a Notes and Domino application into DOCOVA. The import process expects the source to be an application that has already been imported into a DOCOVA Domino instance. DOCOVA SE cannot import an application or it’s data directly from Lotus Notes at this time.
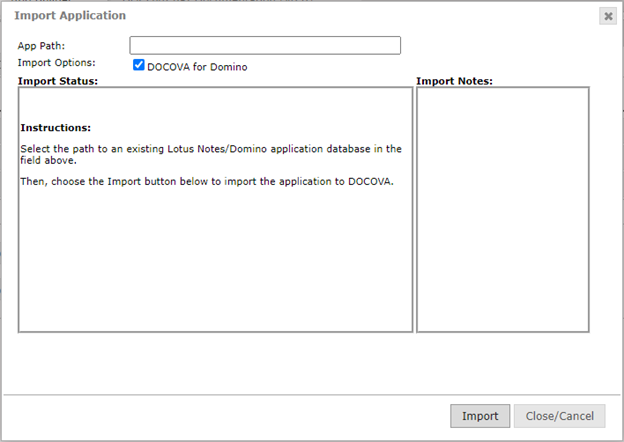
Import Application: Displays the following dialog box. The app path must be entered. When Import is clicked, the import progress is displayed in the Import Status window.
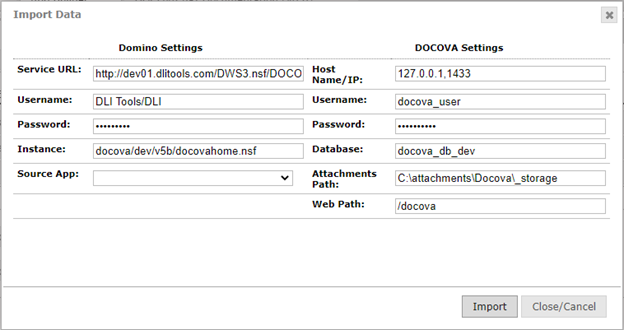
Import Application Data: Displays the following dialog box. The Domino and DOCOVA Settings define the source and target servers for the data import.
3. Libraries |
Libraries in DOCOVA are “applications” that have some specific functionality with many customization capabilities.
DOCOVA’s Libraries provide companies with powerful Enterprise Content Management (ECM) capabilities. Features include workflow processes, version control and much more.
Historically, DOCOVA was an ECM and DOCOVA Libraries formed it’s core. More recently DOCOVA transformed into a low-code application development platform but the document management features have been retained.
Libraries can be created, modified and deleted via the Admin interface as discussed here. However, you can also create and delete libraries in the Standard and Tiled Workspace interfaces. Please refer to the User Guide for more information. Here, we will concentrate on the Admin interface only.
Creating a Library
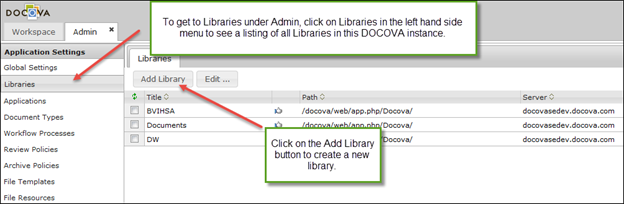
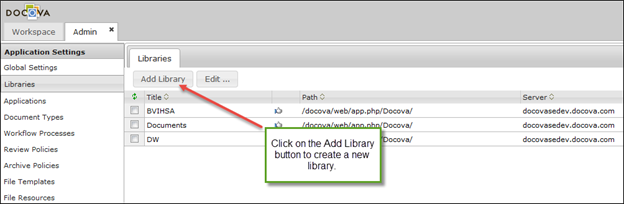
You can create a new library by clicking on the Add Library button at the top of the Libraries view. When you are creating/editing a library, you do it by filling out a form. The form used is called the Library Settings form. This form will guide you in setting up the options and functionality of a library. Check out the Library Settings Form section for more information.
Deleting a Library
You can delete any Library by selecting a Library in the Libraries view and clicking on the Edit button to show the Delete option. You can delete one or many Libraries at a time. You must be the System Administrator or have Manager level access to a Library in order to be able to delete it.
3.1. Library Settings Form |
The Admin System Application allows an Administrator to configure a variety of settings. Many of these, but not all, pertain to Libraries. A Library in DOCOVA is a repository for Documents. Once you create a Library using the Admin System Application it can be accessed from the Libraries System Application.
Libraries can also be created via the Workspace interface using the Create Application functionality, however, this documentation is only dealing with creating and managing libraries through the Administration interface/application.
When you launch the Admin System Application from the Workspace it will open in a tab. On the left of the screen you will see the Global Settings. By default DOCOVA will show you a list of existing libraries. To create a new library click on the Add Library Button.
The Library Form is composed of several sections. Note that some of the options are only available once the library has been created, so it is recommended that you create the library by adding at least the library name, then save and re-open the form to set the various options.

You can create a library from a template. To do this, create the library you want to use as a template as per the instructions above, then subscribe to the Library via the User interface and add the folder/subfolder hierarchy and any documents that you want to appear in other libraries created from the template. Once this is done, go back to the Admin System Application, open the library settings and select the field Enable Use as a Template.
When you create a new library you will be able to select what template to use. The new library will have the same design and documents as the template.
3.1.1. General Settings |
Libraries have several general settings that make them flexible and suitable for many document management applications. The following image is what the General Settings section looks like on a Library Settings document. Each of the options is further described following the image.
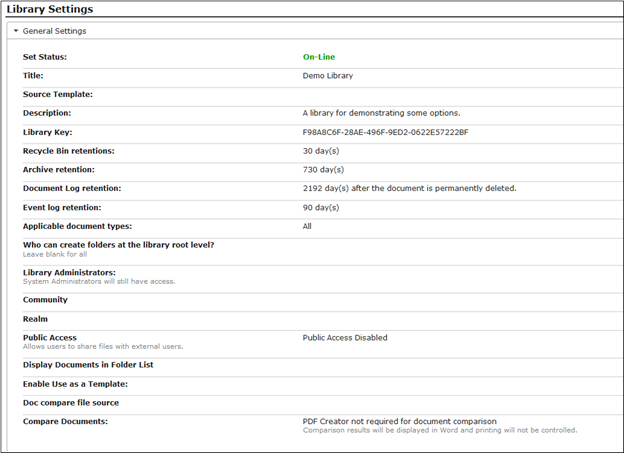
Set Status:
Set status has two options available in a selection field. The two options are On-Line and Off-Line.
This option allows Administrators to manage whether users can see a library or not.
Source Template:
At creation time of a Library, this option allows the user to use a preexisting library to act as a template that this library is created based on.
Title:
Use this field to provide a title for the Library. This is the name of the Library that users will see. “Policies and Procedures” for example.
Description:
This is a description for the Library. Often a Library’s title might be abbreviations, hence this field allows for a longer description of what the Library is used for.
Library Key:
This is a key that is automatically generated for the Library.
Recycle Bin retentions:
When deleting documents in Libraries, they are placed into recycle bins before being permanently deleted. The amount of time that they sit in the recycle bin is determined by the recycle bin retention period. By default this value is set to 30 days.
Archive retention:
DOCOVA Libraries allow users to archive documents on demand. This field determines the amount of time a document is archived for before it gets deleted. By default the retention value is set to 730 days.
Document Log retention:
DOCOVA Libraries automatically log audit information like when folders and documents are created, modified and deleted. This field allows the Administrator to determine how long to keep logs after their corresponding document has been permanently deleted.
Event log retention:
Event logs are also retained automatically. This field allows Administrators to determine how long to keep event logs.
Applicable document types:
DOCOVA refers to its records or content as “documents”. As such, DOCOVA has a concept of document types. Document types are like templates of documents having different functionalities. For example, a document could be a “File Document” type, because it was made to facilitate attaching files and giving them descriptions. Another example, could be an Invoice, where it is a document type perhaps captures invoices, like an invoice date and amount and PDF copy of the original invoice. At any rate, a DOCOVA instance could have many “document types” set up and defined. The “Applicable document types” field is a place where the Administrator can define the only document types allowed to be created in that Library. If left blank, all document types become available.
Who can create folders at the library root level? (Leave blank for all)
This field allows the Library Administrator to restrict who can create folders at the root level in a given Library. This is important when for controlling the top level of folders that can be creating in order to more tightly control the type or categorization of information that is put in the Library. An example of this would be allowing only the Team Leader of a project to control what the top level folders are in order to control how information is managed. Leaving this field blank means any user with author access to the Library can create root level folders.
Library Administrators: (System Administrators will still have access.)
Aside from the DOCOVA System Administrator, other “Library Administrators” can be assigned to control and manage one or more Libraries.
Community:
When creating many Libraries in DOCOVA, they can be grouped into communities and realms to facilitate managing and categorizing Libraries. This field holds the “community” that a Library belongs to. The community and realm are shown in the left hand side folders of a Library.
Realm:
When creating many Libraries in DOCOVA, they can be grouped into communities and realms to facilitate managing and categorizing Libraries. This field holds the “realm” that a Library belongs to. The community and realm are shown in the left hand side folders of a Library.
Public Access: (Allows users to share files with external users.)
This field allows Administrators to turn on the ability to share files with external users. With this option turned on, the sharing option becomes enabled on documents in folders in the Library. Public Access is when the files are easily shared to external users from DOCOVA documents.
Display Document in Folder List:
This is a cool option for Libraries. When enabled, this will show folders and document in the left hand side navigation for the Library presenting the user with a different way of navigating documents.
Enable Use as a Template:
This checkbox allows this Library to be used as a template for other new Libraries. Any Libraries with this option selected will appear in the Source Templates selection field mentioned above.
Doc compare file source:
DOCOVA has a Compare Files capability which allows the user to compare files between documents to see if they are the same, or what is different about the files. This field allows the Administrator to specify the Uploader name to use when multiple Uploaders are involved.
Compare documents:
DOCOVA has a Compare Files capability which allows the user to compare file attachments in documents to see if they are the same, or what is different about them. For the compare process, DOCOVA can use display the results of the comparison depending if the user has software called PDF Creator installed. The “PDF Creator not required for document comparison” option will display the comparison is MS Word, and printing is not controlled. If the “Require PDF Creator to be installed for document comparison” option is selected, then the results will be converted to PDF format for display. If the comparison is run from the Folder option, the ability to print the results will be disabled. If the comparison is run from the Document’s comparison functionality, the ability to print the results is controlled by the Restrict Printing options of the document type.
3.1.2. Subscriptions |
Libraries can be accessed by users, however the User must manually subscribe to the Library using the Subscribe Icon on the top of the Folder Control. As an Administrator you can add their name into the Current Subscriptions field in the Subscriptions section of the Library form. This will automatically subscribe them to the Library and display it in their folder control the next time they access DOCOVA.
To restrict who can subscribe to a Library, add the names of users that Can Access the Library into the Subscription Restrictions field. By default all users can see new Libraries if this field is left blank.

3.1.3. Access Control |
There are two types of DOCOVA administrators, the Global Administrators identified in the Global Settings, and Library Administrators identified on the Library Form. Global Administrators have complete control over a DOCOVA instance, while Library Administrators have control over a Library.
To configure Administrators for a Library, select Libraries then open the Library and navigate to the Library Administrators field and add the names of the individuals who will administer the Library.
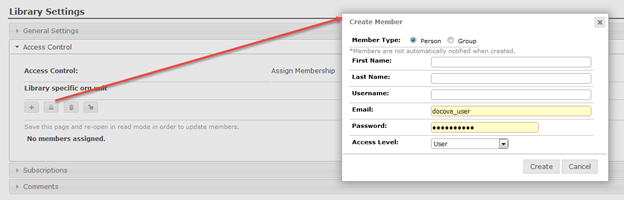
Library Administrators can also be set off the Access Control section of the Library form. In this case they can also Create and Manage Members who are NOT in the company directory. To do this you must first Edit the Library Form and change the Access Control type on the Library form to Assign Membership. Then save and re-open the form.
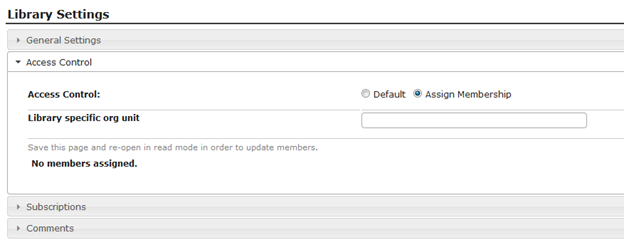
When a library administrator opens this section they will see the controls that allow them to register and assign members.
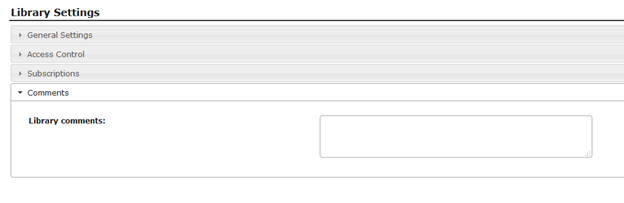
3.1.4. Comments |
The Comments section of the Library Settings form is simply a place where more extensive comments about the Library, it’s purpose and functionality can be detailed.
3.2. Document Types |
Document Types are different types of forms used to capture different information and have different functionality for a variety of purposes.
Document types are only available to Libraries. Historically, DOCOVA was a Document Management platform before it transitioned to a low-code platform. This is partly why DOCOVA has strong workflow and document version controls. As a document management solution, DOCOVA only had Libraries, not Applications. To facilitate flexibility in the types of documents that could be created in Libraries, DOCOVA used the concept of Document Types. The creation of Document Types in the Administration interface is analogous to an early version of the App Builder. More currently, with the advent of building applications in DOCOVA using the App Builder, the need for Document Types in Libraries is becoming limited. Indeed, the creation of Document Types will merge with the App Builder more formally in a future release of DOCOVA.
Examples of document types are:
File Document: a document type which is designed to take a file attachment and a subject field to briefly describe that file attachment.
Policy Document: a document where it might have a few fields to categorize the content and a rich text editor that rich content and images can be added to.
Invoice: where the invoice document type might capture a file attachment PDF version of an incoming invoice that is routed for approvals and distribution or it might be an invoice that has fields and be a functional form for generating invoices.
To create a new Document Type, go to the Document Types view by clicking on the Libraries – Document Types menu option.
Next, click on the Add Document Type button to add a new document type.
You will see the Document Type form shown in Figure 1.0 below.

Figure 1.0.
Read the subsequent Document Type sub- sections for information on the Document Type options.
3.2.1. General Settings |
When initially creating or opening a Document Type document, it opens to the General Settings section as shown in Figure 1.0 below.
See the table below for information on the options available in this section.
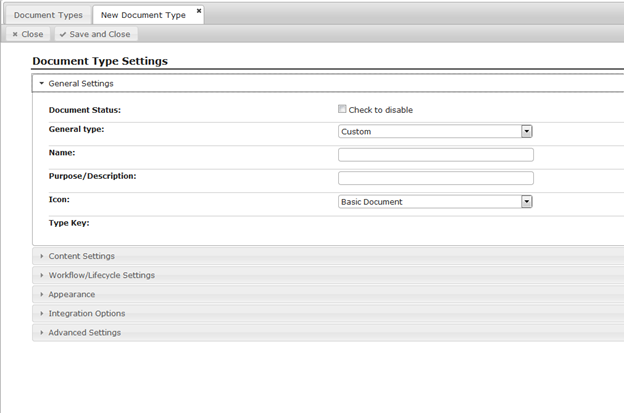
Figure 1.0
General Settings Options | ||
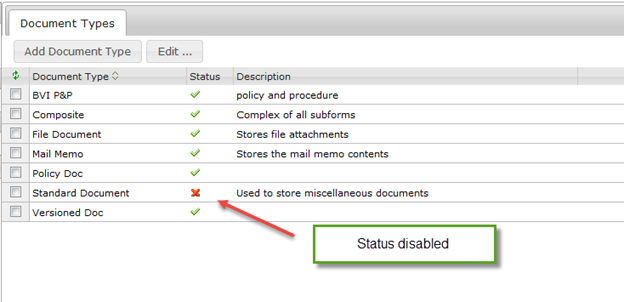
Document Status: | The Document Status option makes the Document Type available or not. By clicking on the “Check to disable” checkbox, the Document Type is somewhat disabled, but, not entirely. If you look at the Document Types view, you will see that the Status column will indicate that the Document Type is disabled by displaying a red X. See Figure 2.0 below. What this means is that when you are creating a new document in a Folder in a Library where a list of Document Types is shown, disabled Document Types are not shown there. The only way to use a “disabled” Document Type is to specifically set up a Folder to use that Document Type. This functionality allows you to specifically make certain Folders in a folder structure use specific Document Types. Or, the opposite of this, not allow certain Document Types to be used to create content in certain Folders.
Figure 2.0 |
|
General type: | This option allows you to choose a general document type. There are four to choose from and are detailed below. Custom: This general document type is fully custom. It allows you to use all of the Document Type options to create a fully customized version of your Document Type. Standard document: The Standard Document Type is a preset document type that has some general functionality. It provides a Subject/Title field, an area for adding text and file attachments, it has a built in lifecycle, workflow and version control. It can be used for generic content types like Policy documents that need to be approved and be updated, hence the version control. Mail memo: The Mail memo Document Type is designed to accept imported email content into Folders. You can name your Document Type something like Project A Correspondence for a project folder and import email content into that Document Type. It has all the From, To, CC, Subject and Body field to contain a copy of messages. File document: A File Document Type is generally used for file storage. Since Libraries have a folder, sub-folder architecture, it makes sense to be able to store file attachments within this type of construct. Again, you can provide a Document Type name for specific files that might be filed into a particular folder structure. For example, you might have a Document Type named Marketing Graphics to track the graphic files (jpg, bmp, gif) that are used for different brochures or emails or websites. |
|
Name: | Provide a name for the Document Type. |
|
Purpose/ Description: | Provide a purpose or description for the Document Type so that other people understand what it is being used for. These descriptions also show up in dialogs where users are creating document content and selecting Document Types. |
|
Icon: | Select an icon to associate with the Document Type. This can later be used in Folder Perspectives to help visually identify different Document Types together in a view. |
|
Type Key: | This is a system generated unique key given to the Document Type. This can be used by some of the functions in DOCOVA’s API to automate functionality. |
|
3.2.2. Content Settings |
The Content Settings section of Document Types allows for the functional layout of a Document Type.
A Document Type is made up of many typical parts, like a place to add rich text, a place to add field information or a section to attach files.
Document types allow you to add up to eight sections that contain one of these elements. It may seem restrictive at first, however, the ability to add subform design items makes Document Types very functionally flexible as well as super easy to assemble.
Figure 1.0 below show the Content Settings. Each of the eight sections numbered 1 – 8 has a dropdown field where you can select a design item to build the Document Type. The design elements and their properties are explained below.
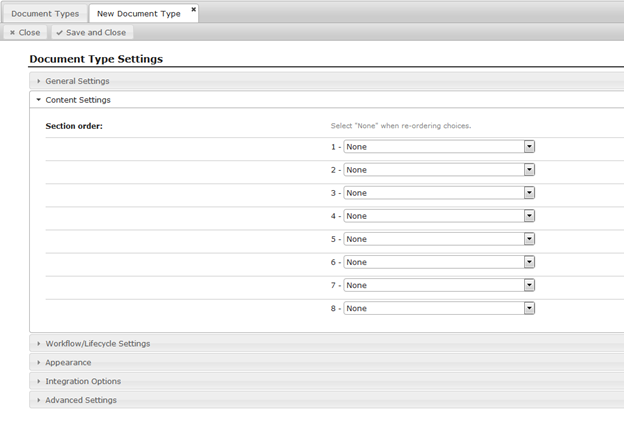
Figure 1.0
As you select a design item to include, its corresponding options will appear in a tabbed table below the section selections. Figure 2.0 below shows the tabbed table of properties for some elements that have been chosen. Each tab corresponds to a design element that has been selected. Each of properties for the design elements is explained in more detail below.
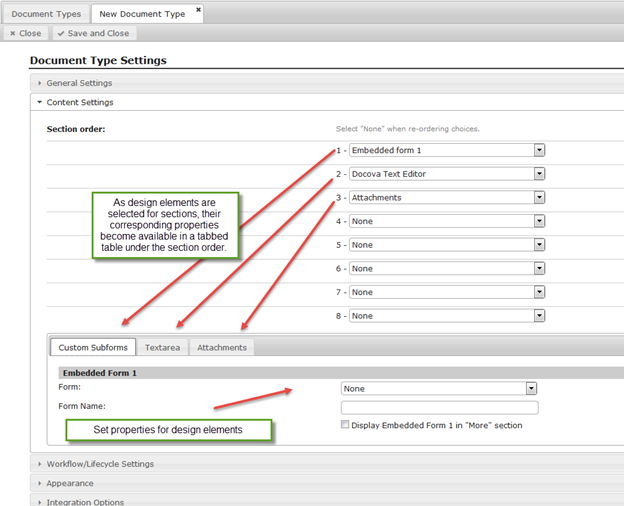
Figure 2.0
There are thirteen element types that can be used when building a Document Type. Their properties are explained in the table below.
None | None means that no design element has been selected for the corresponding section. Also, when reordering elements in the sections, setting the section back to None can be helpful. | ||||||||||||||
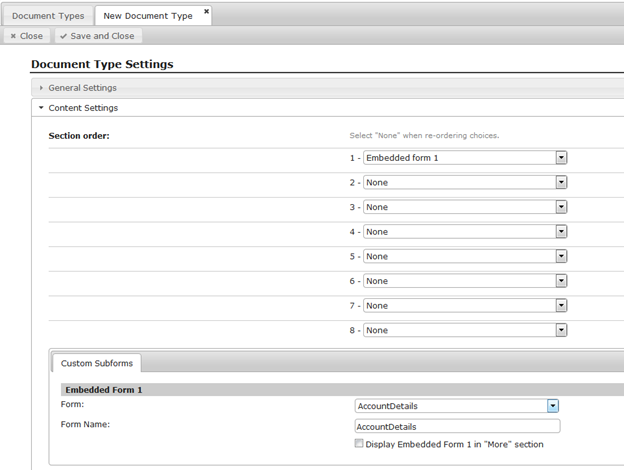
Embedded form (1, 2, 3) | There are three Embedded form elements. This allow you to add three separate embedded forms or “subforms” into a Document Type. Figure 3.0 below shows the properties associated with an Embedded form element.
Figure 3.0 Design Element Properties Form: This is a dropdown or selection field that provides a list of subforms that are available in this DOCOVA instance. Select one of the subforms. Form Name: Upon selecting the element, the Form Name will be added. Display Embedded Form (1, 2, 3) in “More” section: On the Document Type, the embedded form can either be shown in the primary form layout, or the subform can be shown in the More section depending on how the developer needs the Document Type to be laid out. | ||||||||||||||
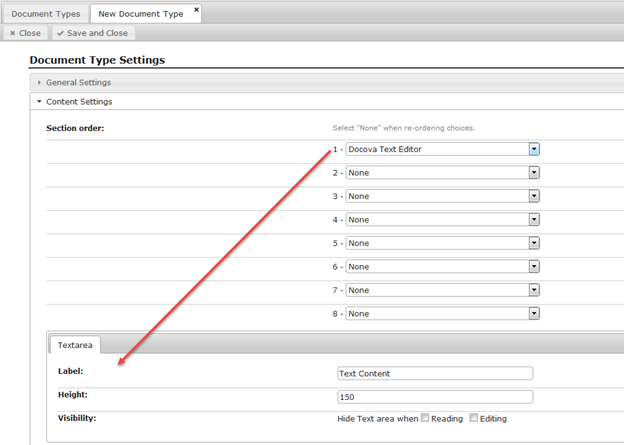
DOCOVA text editor Rich text Editor Plain text editor | DOCOVA has three editors to choose from. The editors are consolidated here because their properties are the same. The purpose of these editors is to enter paragraph text into Document Types. Each of the editors is explained below. Figure 4.0 shows the Properties tab for a text editor element. Plain text editor: The plain text editor is designed for quick and simple text entry. With little overhead, the element is fast and suitable to text that doesn’t need to have different font decoration. Just plain text. This is suitable for such things as comments as an example. DOCOVA text editor: The DOCOVA editor allows the user to add more decoration to the text entered including things like bold, font size and color. It is the in between option between the plain text editor and the rich text editor. Rich text editor: The rich text editor has the most options for manipulating the text in a document type. Everything from font family, size and color to bold, italic, underline, the ability to add tables, add images and so on. This is the editor to use when more “rich” content is required.
Figure 4.0 Design Element Properties Label: The label is the field label you want to accompany the editor on the document type. The label might be something like “Please add your comments below”, or “Description:” as examples. Height: The editors come with a default height of 150 pixels however, you can change this to something more suitable for your Document Type, like 600 pixels for example. You may want to conserve space or encourage content. Visibility: Allows hiding the text editing area in read or edit mode. | ||||||||||||||
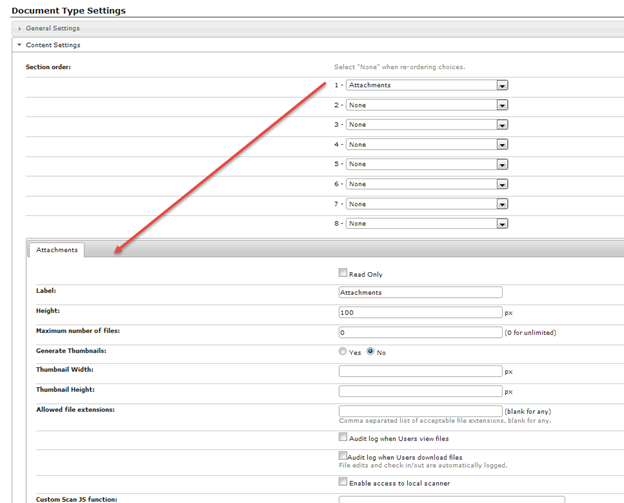
Attachments | The Attachment design element allows for the ability for the Document Type to accept file attachments like Word, Excel, PDF or video files. DOCOVA’s file attachment capabilities can be quite in depth. The properties are listed below.
Figure 5.0 Design Element Properties Label: This is the field label to show above the file attachment control on the Document Type. Examples of what this might be are “Attachments:” or “Files:” or “Invoice:” if it was only restricted to invoice files. Height: The height controls how high the file attachments element is on the Document Type. By default, the controls width is 100% of its container. Maximum number of files: Controls the number of files can be attached to the document. For example, you may want to only allow one file to be attached to a document. Generated thumbnails: When a file is attached, a thumbnail of the file will be generated. Thumbnail Width: Controls the width of the generated thumbnail. Thumbnail Height: Controls the height of the generated thumbnail. Allowed file extensions: This restricts the type of files that can be attached to a document. For example, perhaps you only want Excel spreadsheets to be attached, this option will allow you to restrict it to that. Audit log when Users view files: This option produces audit log entries automatically for when users view a file. Audit log when Users download files: This option produces audit log entries automatically for when users download a file. Enable access to local scanner: This option enables some code that will connect with a locally connected document scanner. Custom Scan JS function: This option is where custom Javascript can be called to handle the way that scans are created. Enable File Check in and Check out tracking: This option will allow users to check out and check in files. It will also manage edit capabilities depending on who has a file checked out. Default List Type: The way that file attachments are displayed on a document is called the “list type”. File attachments can be displayed in one of three ways. This can be useful depending on how many files can be attached to a document. The list type is similar to what you would find with the Windows Explorer folder format. The three display types are: Icons: Shows files as images. List: Shows a list of files, showing only file names. Details: Shows a list of files, showing file names, dates and size. Associated Template Files: Template files are Word or Excel files. They can be added to DOCOVA under the Libraries – File Templates section. The use of these files is for integration with information and functionality around Document Types and can be very powerful. By identifying a file template, automation can be leverage to share data between documents and bookmarks in a Word files for example, or to populate an Excel template with values. | ||||||||||||||
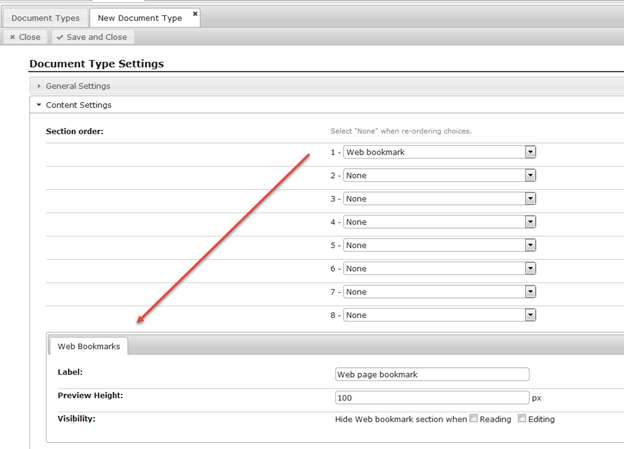
Web bookmark | Use the Web Bookmark element to display web pages within a document. This might be useful in a reference library or library where finished pages of a website are approved and or commented on. Urls are provided by the user and are previewed directly within the document or can be launched into their own browser window. Figure 6.0 below shows the properties available when choosing the Web Bookmark element.
Figure 6.0 Design Element Properties Label: The design element’s label. Enter something like “Web pages” or “Reference page”. Preview Height: Set the height of the control on the document. You can provide a height that shows more or less of the web bookmark page that is being displayed. If the height is shorter than the page itself, scroll bars are automatically available. The user can also launch the page open into its own browser window at anytime for full size viewing. Visibility: This option determines whether the web bookmark is shown in read mode and or edit mode. | ||||||||||||||
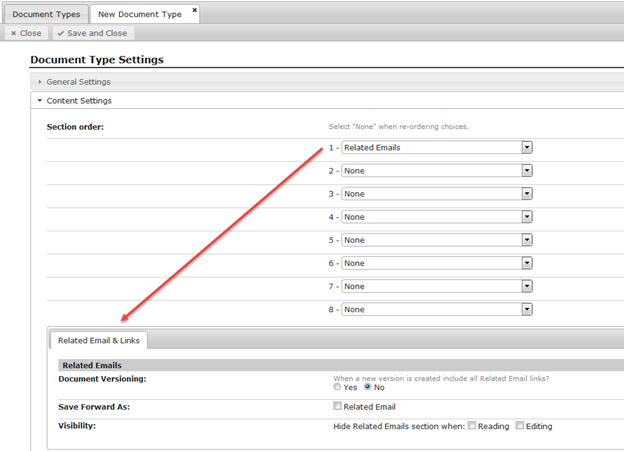
Related Emails/Mail header | The Related Email design element provides an interface on a document type which allows the user to select email messages that are copied into DOCOVA and associated to the current document. These associated email messages are displayed in the Related Email section on the document type. Figure 7.0 below shows the Related Email element properties. More information about the properties can be found below.
Figure 7.0 Design Element Properties Document Versioning: If related emails are a part of a document that goes through version control, this option determines if the Related Email links are brought over to the new version that is created. Save Forward As: Save forwarded emails are related emails. Visibility: This option determines whether this design element is shown in read mode and or edit mode. | ||||||||||||||
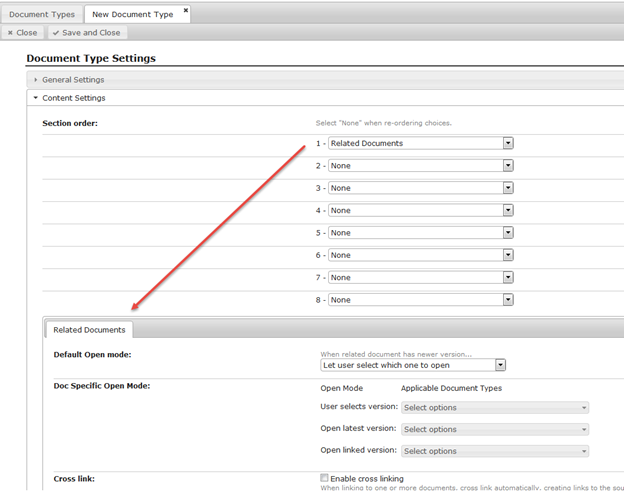
Related Documents | The Related Documents design element is a very helpful component when relating documents together. For example, Policy documents can be linked to their corresponding Procedures, or Guidelines can be related to their corresponding Returns.
Figure 8.0 Design Element Properties
| ||||||||||||||
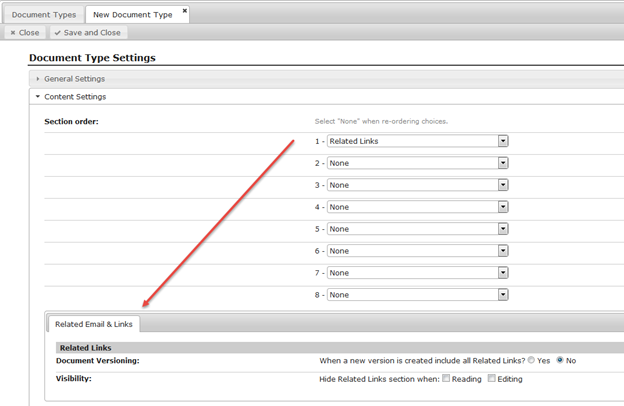
Related Links | The Related Links section interface allows you to add web links to a document. Figure 9.0 below shows the properties associated with this elements.
Figure 9.0 Design Element Properties Document Versioning: Select Yes to include all Related Links and Related Emails when a new version is created. Visibility: This option determines whether this design element is shown in read mode and or edit mode. | ||||||||||||||
Keywords | The Keywords design element allows you to add tags to a document. This allows documents to be full text searched on these keywords. | ||||||||||||||
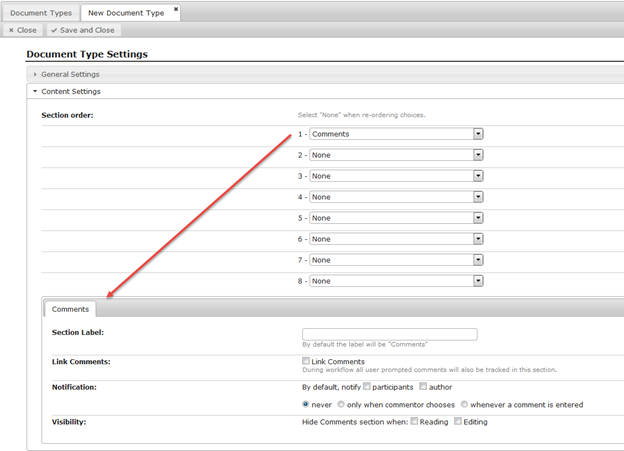
Comments |
Figure 10.0 Design Element Properties Section Label: Provide a label for this section. By default the label is “Comment”. Link Comments: Check this option if you want to have the comments that are captured during workflow to be tracked by this comment section. Notification: Use notifications to choose when to notify workflow participants or the author whenever a comment is entered on the document. Visibility: This option determines whether this design element is shown in read mode and or edit mode. |
3.2.3. Workflow/Lifecycle Settings |
Document Types have a Workflow and Lifecycle section. The Workflow/Lifecycle Settings section allows the developer to configure several aspects of workflow around this Document Type. The Document Type workflow and lifecycle properties are divided into three areas, Document Status, Versioning and Workflow. Figure 1.0 below shows the Workflow/Lifecycle Settings section in a Document Type. See the table below for more details about the options.
Conceptually, documents in DOCOVA Libraries can go through a lifecycle with workflow. The lifecycle of a document represents the stages of its life. Initially, documents start off as Drafts. Typically in the Draft stage is where documents undergo their workflow and are reviewed, modified and approved or declined by members of the workflow processes. The last step of a workflow typically moves the document into the next lifecycle stage, that is, Released. That may be the extent of a documents lifecycle, however, if they also have version control they may go through stages like being superceded by new versions. Documents may also be archived as part of their lifecycle and deleted. DOCOVA makes it easy for organization to define these document stages or statuses and workflow steps.
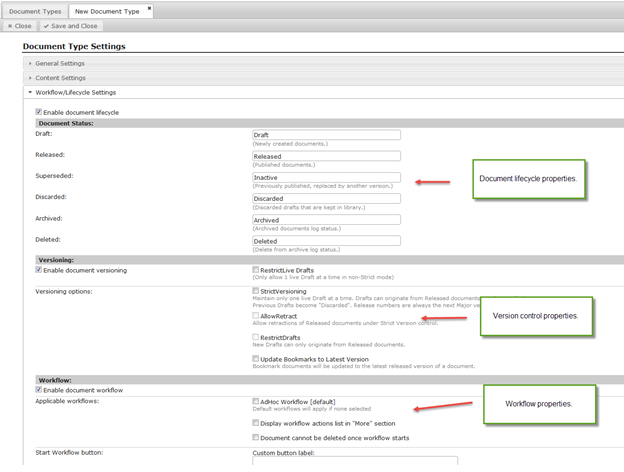
Figure 1.0
Document status: | Enable document lifecycle (checkbox): Checking this option enables the lifecycle options for this form and hence the documents that are created with it. When you enable workflow on a form, you will be presented with a number of stages or statuses that the document will go through in its workflow. In DOCOVA there are potentially 6 lifecycle stages a document can go through. Typically, a document starts of being in a “draft” mode when they embark on their workflow. When workflow is completed, the document is “released” or “completed” in some way. In the future, the document can encounter other stages where it is superseded by newer version, or discarded or archived, or possibly deleted. For each of these stages you can rename the stage by entering a different word for the corresponding stage. The following are the stages and their default values. Draft: Draft Released: Released Superseded: Superseded Discarded: Discarded Archived: Archived Deleted: Deleted NOTE: When using workflow your form requires a few specific fields in order to help track workflow items. |
Versioning: | Enable document versioning: Enabling this checkbox to enable version control. When this is enabled the Versioning options below become available. Restrict Live Drafts: This option allows you to restrict the number of live drafts to be one. |
Versioning option: | Strict Versioning: This option turns on strict versioning. This enables the options below. Only one live draft will be allowed at a time. Allow Retract: This option allows the user to retract a released version or not. If a document is retracted, it’s previous version will become the released version again. Restrict Drafts: This only allows that new drafts can only originate from released documents. Update Bookmarks to Latest Version: This option updates bookmarks to link to the latest version of the document. When a new version is created: Copy all attachments to the new version: When a new version is created, automatically copy all attachments to the new version. Remove all attachments from the new version: When a new version is created, do not bring any attachments to the new version. Prompt the user to select which attachments to remove: When a new version is created, prompt the user for what attachments to keep. |
Workflow: | Check the Enable document workflow checkbox to enable workflow automation to the document type. |
Applicable Workflows: | Available configured workflows will be displayed here with a checkbox beside them. You can choose one or more workflow processes to associate with the current document type. Display workflow actions list in “More” section Check this checkbox to display the workflow in the More section of a document. Otherwise, by default, the workflow will be displayed on the document. Document cannot be deleted once workflow starts Check this checkbox to prevent a document from deletion once a workflow process has started. |
Start workflow button: | When a document has workflow, it automatically gets a starting workflow button, with a button label of “Start Workflow”, but you have the ability to change it to something else like “Submit Requisition” or whatever you require. Additionally, you can execute Javascript you might want when the Start workflow button is clicked. |
Complete Review button: | This options allows you to run Javascript when the Complete Review button is clicked. |
Approve button: | This options allows you to run Javascript when the Approve button is clicked. |
Deny button: | This options allows you to run Javascript when the Deny button is clicked. |
Release Document button: | This options allows you to run Javascript when the Release Document button is clicked. Additionally, you can specify what JS you want to run before the release and after the release. |
Button visibility: | This option allow you to choose if you want to only show the workflow buttons when the document is in Edit mode for example, or some custom function that you need. You may need this in order to facilitate some functionality about your form. |
Review button label: | Same as the Start workflow button label, you can change the label for the Review button. |
1.1.1. Appearance |
DOCOVA allows you to manipulate the appearance of Document Types via the Appearance section.
The Appearance section provides three tabs of options as can be shown in Figure 1.0 below. The table below explains the appearance options.
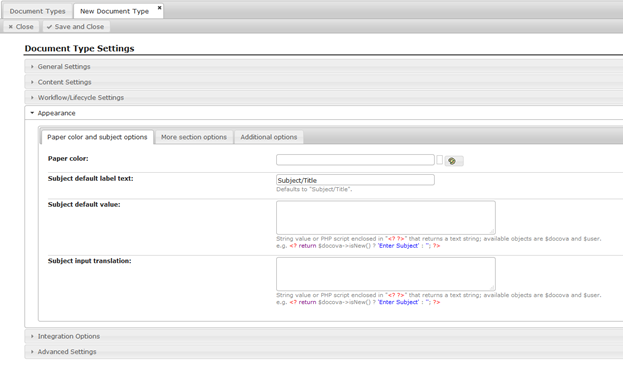
Figure 1.0
Paper Color and Subject Options | |
Paper color: | Change the background color of the Document type. By default a Document type’s background color will be white, but, you can change that to any color you like. This can be helpful as a document type identification. |
Subject default label text: | Documents in libraries have at least a “Subject” field by default. The label for the field is “Subject/Title” by default. You can change this default value to something more relevant to your document type. |
Subject default value: | Provide a default value for the “Subject” field that will be filled into that field at creation time. |
Subject input translation: | The input translation for the Subject field is php code that performs some action on the value in the field. For example, you might trim any leading or trailing spaces from the value in case a user entered them extraneously. |
More Section Options | |
Subject and Status fields: | In addition to a Subject field on a document in Libraries in DOCOVA, there is also a Status field. This field maintains the lifecycle stage of the document, beginning with a default of “Draft” unless you’ve changed that. By default the Subject and Status fields appear at the top of the Document Type when composing a document. By checking the Display Subject and Status in “More” section checkbox, you can move these fields into the More section of the document. |
‘More’ section label: | The “More” section of a document contains some details about the document like who and when it was created along with a host of other information. The More section is a collapsible section on the document. You can expand or collapse the section with the More button. This option allows you to change the name of this section to something else. It defaults to “More”, but you might want a different name for it like “Meta-data” perhaps, or something else. |
Hide entire document header when: | Allows you to hide the document header when the document is open in Read mode and/or Edit mode. You can also provide a formula to determine when you want the header to be visible or not. |
Document Details Tab | In all cases below, PHP script enclosed in “<? ?>” that returns true (allowed) or false (not allowed). Default is true. Available objects are $docova and $user. |
Change document author: | Restricts access to be able to change the document author field based on a formula. |
Show Details Description: | Determine when to show details description. |
Keywords: | Determine enabling keywords. |
Review Cycle: | Restricts access to change the Review Cycle for the current document. |
Archiving: | Restricts access to change the Archiving Cycle for the current document. |
Read/Edit Access Tab | |
Change Owner: | Provide the ability to change the document owner. |
Change Additional Editors: | Provide the ability to change the Additional Editors field. |
Change Restrict read access to: | Provide the ability to change the Restrict Read Access field. |
Additional Options | |
Top Banner: | Provide text for the Top Banner. If not text is provided, not banner is shown. |
Bottom Banner: | Provide text for the Bottom Banner. |
Section style: | Section styles are Default or Plain. The “default” style shows a section label and hence the Section label property below only shows if this Section style is “Default”. |
Section label: | Provide a label for section. |
Background color: | Provide/choose a background color for the section. |
Additional style CSS text: | Allows you to provide any additional CSS that you want. |
3.2.4. Integration Options |
Document Types have several integration options that can be toggled on or off. The Integration Options for a Document Type are shown below in Figure 1.0. Each of these options is explained below.
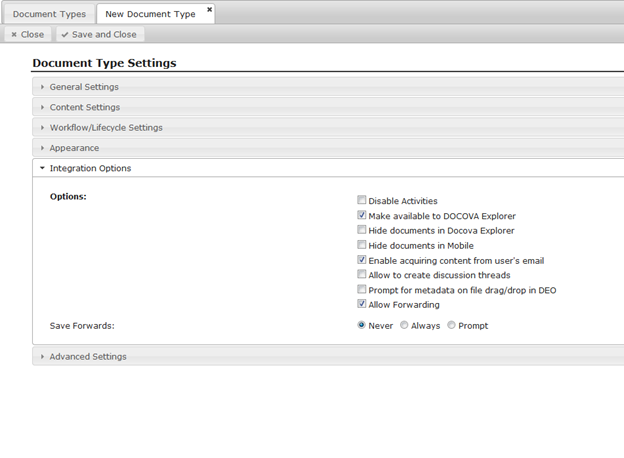
Figure 1.0
Document Type Integration Options | |
Disable Activities | Check this option to disable the ability to create Activities for documents created with this Document Type. |
Make available to DOCOVA Explorer | Check this option to enable the ability to create documents using this Document Type via the DOCOVA Explorer plug-in. |
Hide documents in DOCOVA Explorer | Check this option to hide documents in DOCOVA Explorer that were created using this Document Type. |
Hide documents in Mobile | Check this option to hide documents in the mobile interface that were created using this Document Type. |
Enable acquiring content from user’s email | Check this option to turn on the automated components (buttons) for users to be able to acquire messages from their email when using this Document Type. |
Allow to create discussion threads | Check this option to turn on the ability to create discussions on this Document Type. |
Prompt for metadata on file drag/drop in DOE | Check this option to automatically prompt users for information about files that are dragged and dropped onto the DOCOVA plug-in. |
Allow Forwarding | Check this option to allow documents created with this Document Type to be forwarded like a forwarded email. Save Forwards: For forwarded documents, choose if they should be saved automatically, should never be saved, or to prompt the user to choose at the time of forwarding the document. |
3.2.5. Advanced Settings |
Document Types have more advanced settings around Document Opening, Viewing and Saving operations than can be leveraged.
Figure 1.0 below shows the Advanced Settings section of a Document Type. The table below explains each tab and their associated properties.
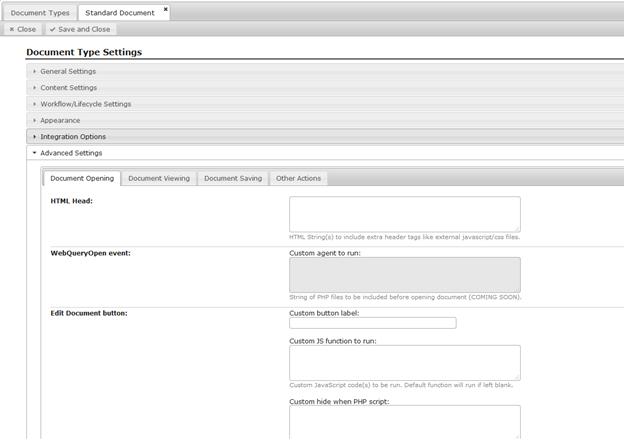
Figure 1.0
Document Opening Tab | |
HTML Head: | This option allows any valid additional HTML Head content to be included for any documents created with this Document Type. |
WebQueryOpen event: | WebQueryOpen is a similar event to the OnLoad event except that it occurs in the backend prior to the OnLoad event. |
Edit Document button: | By default, each document type has an edit button to put a document into edit mode to allow users to edit the content of a document. This option allows you to modify the edit button’s behavior. Custom button label: Change the button label. By default the label is “Edit”. Custom JS function to run: By default, the Edit button will put the current document into Edit mode, however, you can add your own JavaScript to manage what the edit button does. For example, you may run some other JS code before opening the document, or check to see if the current users belongs to a particular group. Custom hide when PHP script: Provide PHP script code to hide or show the Edit document button. |
Document Viewing Tab | |
Restrict Printing: | This option allows you to restrict the ability for users to print files attached to the current document. |
Print event: | This option allows you to provide JavaScript code of your own for printing the current document. |
Document Saving Tab | |
Save and Close button | Custom button label: Custom JS function to run: Custom hide when PHP script: |
OnBeforeRelease Javascript event: | Custom JS function to run: |
Field validation: | You can automate field validation on document using Document Types. This is useful when ensuring that “required” fields are filled in. There are three different validation modes that can be leveraged. They are explained below. None: This validation mode is no validation, meaning that Field Validation is not being used. Built-in Field Validation: This validation mode allows you ensure that a value has been provided for required fields. Names of fields to validate This is a list of fields to validate. Simply type in the fields that you want validation to be confirmed for. Optional, matching data types (“text”, “number” or “date”). blank enties are treated as text. This option is a validation where you can also validate the data type of the particular field. When using a list of fieldnames as the list of names to validate, you can provide a corresponding list of each of their data types. For example, if a field is a number type, this validation will ensure the value entered for that field is also a number. Optional, friendly field labels to be included in error message (field name will be user if blank). This option allows you to provide a field name for the error message is validation fails for a field. Custom JavaScript Function: This mode allows for a custom JavaScript function to run. |
WebQuerySave event: | The WebQuerySave allows you to specify an agent to run. This is a backend process that happens after the onUnload event. |
Other Actions Tab | |
Filter Attachments Script Name: | Provide the name of the filter attachments php script class to apply filtering on print from folder, export from folder, forward email and send emal notification. |
3.3. Workflow Processes |
Workflow through the Administration interface in DOCOVA is presented in a different way than in an Application. However, the two underlying results are similar.
Workflow was originally developed in the Administration interface for Document Types in libraries.
Subsequently, as DOCOVA grew into a low-code application development platform and applications were introduced, the application workflow was modified as well.
Application workflow is based on the original Document Type workflow, however, the interface allows you to drag and drop these “step types” into a flow chart and notification actions are not presented as a notification element that you can choose where in the workflow you want it. So, the interface has become more flexible, but the concepts are the same.
Workflow in DOCOVA started with the processes being defined in the Administration interface as is shown below. The basic concept is this;
1) Workflow starts at some point.
2) During workflow, some modification to a document/asset it made. We call these “review” processes.
3) During workflow, an approval takes place. This might be a confirmation or a declination for example, but the event is the same. We call these “approval” processes.
4) Workflow ends at some point.
These four steps above can be summarized as, a workflow starts, people review and approve and the workflow ends.
There are some details in between, like sending notifications and criteria which may be used for what steps are next and so on, but the concept remains the same. Start – review – approve/decline – end.
The Application Workflow also includes a notification element which has the notification actions as listed below with the added benefit of being able to be placed anywhere in a workflow.
Application Workflow also add another element called a decision where workflow can branch based on conditional criteria. With the Administration Workflow, this kind of functionality can be achieved through the DOCOVA Workflow API.
The following tables detail these properties. The first table describes Workflow Properties, the second table describes Step Properties.
Workflow Properties | |
Name: | Enter a name for the workflow. |
Description: | Provide a description of what the workflow is for. |
Key: | The workflow key is automatically generated and can’t be edited or changed. The DOCOVA API has workflow functions that can leverage the workflow key. |
Allow document author to customize this process: | This option allows the workflow to be somewhat adhoc in that the Author of the document can change who the users are that are responsible for completing the workflow steps. |
Allow to release bypassing workflow: | This allows the author to release a document without having to go through workflow. This often happen more in a document management setting where version control is being used. |
Use as default document workflow if none specified: | Set a workflow as the default workflow in an application. |
Review Policies are a very powerful element in DOCOVA. Sometimes, documents that are created require review over a period of time.
Quality Management documents are a good example of this, where many documented quality management procedures need to be reviewed and updated once a year or once a month.
Figure 1.0 below shows an example of the Review Policy Settings form used to create Review Policies. See the table below for more detailed information about the options.
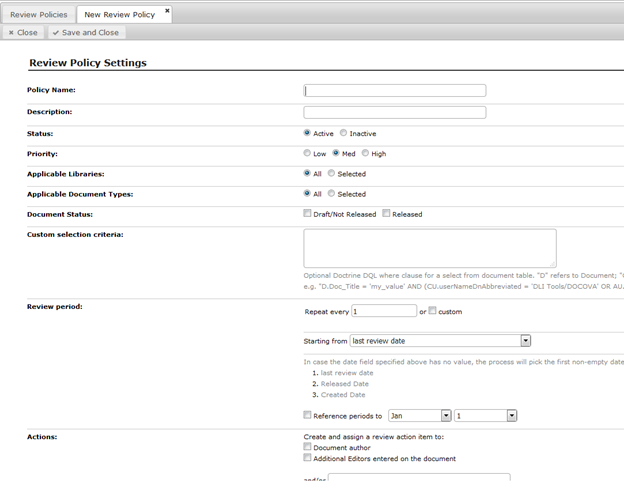
Figure 1.0
Review Policy Settings Options | |
Policy Name: | Provide a name for the Review Policy. |
Description: | Provide a description of the purpose of the Review Policy. |
Status: | Choose “Active” or “Inactive” to make the policy available for use or not. |
Priority: | Assign a Low, Medium or High priority to the policy. This helps determine which policy to run first when more than one policy is assigned to a Document Type. |
Applicable Libraries: | Select which Libraries this Review Policy is assigned to. |
Applicable Document Types: | Select the Document Types this Review Policy is assigned to within the Libraries that it’s assigned to. |
Document Status: | Choose which documents to act on in term of status. Review Policies can be set to run on Draft only documents or Released documents. |
Custom selection criteria: | Provide a custom Doctrine DQL selection formula for selecting which documents to run on. |
Review period: | Set up a Review Period on which this Review Policy runs. These options allow for the scheduling of subsequent repeat running of the Review Policy. |
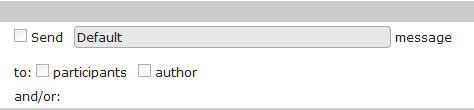
Actions: | The Actions are responsible for assigning the Review Policy to individuals. Assignees can anything from the Author of the document, the Additional Editors or even names that are listed in fields on the document. A corresponding Review Policy notification message is assigned to the Policy and will be sent out to the recipients on the Review period criteria. |
Action options: | The Action options define when a Review Policy is created for the current period and whether or not it should run within a certain time frame of a Review Period date. For example, if the Review Policy is supposed to run on the first of January and every 30 days from there, except the reference date is within the first 30 day increment, to skip that shortened initial period. |
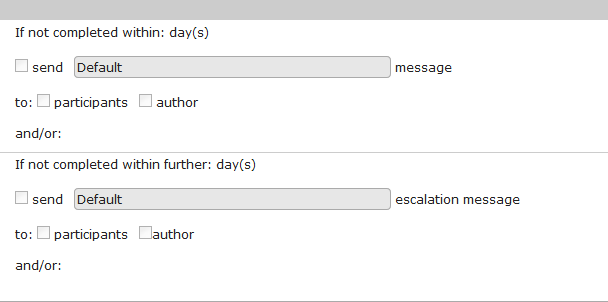
Delayed actions: | The Delayed actions are similar to the delay actions defined for Review and Approve workflow steps. If an Assignee is notified of a Review Policy where some action needs to be performed on a document, but that review does not happen within a certain time frame, then escalation messages start to go out to inform people that this is past due. |
3.5. Archive Policies |
Archive Policies are automated processes designed to archive documents based on defined criteria. When creating a new Archive Policy, you will see the form shown in Figure 1.0 below.
The table below provides more information on each of the Archive Policy options.
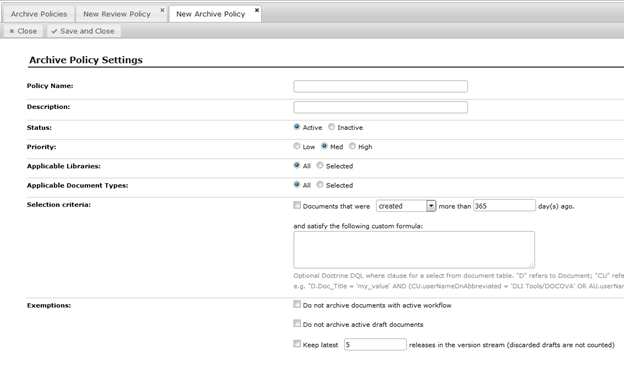
Figure 1.0
Archive Policy Settings | |
Policy Name: | Provide a name for the Archive Policy. |
Description: | Provide a description of the purpose of the Archive Policy. |
Status: | Choose “Active” or “Inactive” to make the policy available for use or not. |
Priority: | Assign a Low, Medium or High priority to the policy. This helps determine which policy to run first when more than one policy is assigned to a Document Type. |
Applicable Libraries: | Select which Libraries this Archive Policy is assigned to. |
Applicable Document Types: | Select the Document Types this Archive Policy is assigned to within the Libraries that it’s assigned to. |
Selection criteria | Provide a custom Doctrine DQL selection formula for selecting which documents to run the Archive Policy on. |
Exemptions | There are a few exemptions that can be defined for an Archive Policy as defined below; Do not archive documents with active workflow Check this option to ensure that the Archive Policy does not archive documents that are currently going through an active workflow. It may be that the selection criteria that has been defined for this policy matches a document that is currently going through a workflow. This option will ensure that document won’t be part of the archive as of yet. Do not archive active draft documents Check this option to exclude “draft” documents from an Archive Policy if the policy selection criteria matches. Typically draft documents are about to begin their workflow process and this will prevent an Archive Policy from picking up the document and archiving it before it even has a change to go through it’s workflow process and be released. Keep latest [N] releases in the version stream (discarded drafts are not counted) Checking this option will ensure that a certain number of superseded versions of a document will not be archived in the event that they match an Archive Policy criteria. |
3.6. File Templates |
File Templates are a great way to automate document creation in DOCOVA. When creating a new File Template the form in Figure 1.0 will be presented.
The table below details each of the options shown.
The functionality of File Templates is to leverage file types like MS Word and MS Excel along with information and automation from DOCOVA to produce repeatable documents and automate work.
In the example shown in Figure 1.0, a Sample Proposal template MS Word document has been attached to the File Template Settings document.
The Sample Proposal Template.doc Word file, contains bookmarks that will match some of the field names of a corresponding Document Type that will use the Template File.
When creating a new document using the Document Type that uses the File Template, as the file is attached, it will pick up the field values from the document in DOCOVA and populate the bookmarks in the Word file.
This means that a document can be created in DOCOVA, with the details required for a proposal. The document can go through workflow, and then upon approval it can generate a formal Word document with the required information that can then be saved, printed, emailed, signed and filed making it much easier to perform that type of operation.
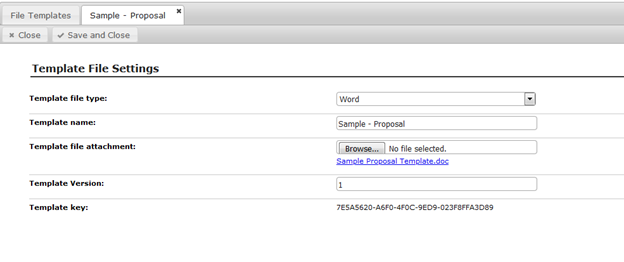
Figure 1.0
Template File Options | |
Template file type: | Provide a file type for this template. This aids in looking up templates from Document Types. There are three options, MS Word, MS Excel and MS Powerpoint. |
Template name: | Provide a name for this File Template. |
Template file attachment: | Attach the actual Word, Excel or Powerpoint file to this document. |
Template Version: | Provide a template version. This option allows you to keep track of file template versions as they may change over time. |
Template key: | This key is system generated and cannot be edited. This key can be used by some of the DOCOVA API for further automation capabilities if desired. |
3.7. File Resources |
File Resources provides a place where additional files that might be leveraged in DOCOVA in Libraries or Applications can reside.
HTML Resource and Application Image, CSS and JavaScript elements tend to be the first place to go to provide these types of resources, however, File Resources can be leveraged if something like an image or style sheet or JavaScript library doesn’t seem to logically fit into those contexts, they can put added and managed here.
To create a new File Resource, navigation to File Resources in the Admin app menu, in the File Resources view, click on the Add New File Resource action button.
Figure 1.0 below shows the Resource File Setting form used to add new File Resources.
Profile the file type and a name, then click the Browse… button to attach the desired file.
A resource version field is also available to manage multiple version of the same file.
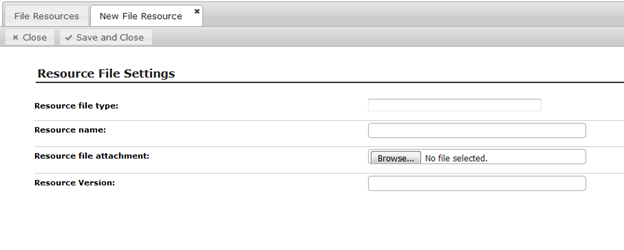
Figure 1.0
3.8. View Columns |
In order to talk about View Column, we first need some background about why they are needed and why they appear in the Admin app.
When you are navigating through a Library, and go to a Folder, a list of documents in that Folder are displayed with a Folder View. The Folder View is made up of several columns and each column contains information pertaining to the documents, like the value of their Status field, or the date they were created.
The arrangement of columns in a Folder are called Perspectives because they provide us with a certain “perspective” of the documents in the Folder. These Perspectives can be modified in order to create new Perspectives that are more advantageous to different ways of looking at the data.
The columns used by the Perspectives are made up of built-in fields, custom fields and formulas.
Every folder has a Default Perspective but users can change it and create their own custom perspective by right clicking on the column headings and adding or removing columns, changing the column properties, or categorizing and sorting. Once a perspective has been configured the way you want, note that the changes will be lost after the user navigates away from the folder unless they are saved as a “New” perspective. Figure 1.0 below shows right clicking on a column header, opening the Properties dialog for the column and selecting one of the View Columns.
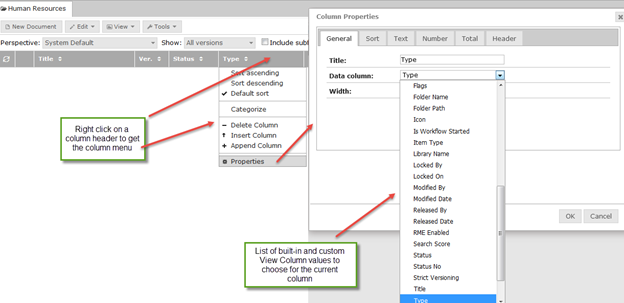
Figure 1.0
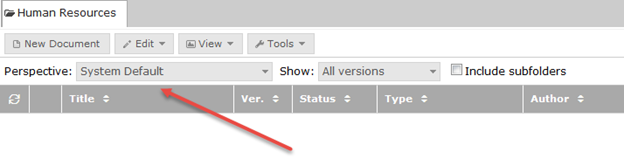
Make sure the View Options Bar is enabled to see the available perspectives. Figure 2.0 below shows the View Options Bar and the Perspective selection field where you can select different perspectives that have been saved for this Folder.
 .
.
Figure 2.0
To save a New Perspective click on the Tools – Edit/Save Perspective menu item to get the View Perspective dialog as shown in Figure 3.0.
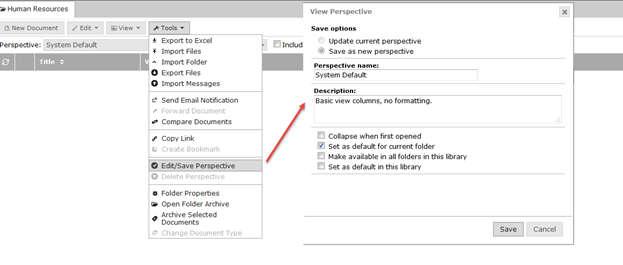
Figure 3.0
The View Perspective dialog allows you to update the current perspective or create a brand new perspective.
Provide a perspective name and description and then select from four options as explained below;
Collapse when first opened
If the perspective is categorized, this option will collapse all categories when the view is first opened.
Set as default for current folder
Although each Folder has a default perspective, any perspective can be made to be the default perspective when the folder opens.
Make available in all folders in this library
Perspectives are created in a Folder, however, this option will make the perspective available to other folders too.
Set as default in this library.
This option sets the current perspective to be the default perspective for folders for the whole library.
Creating a View Column
Now that we can see how View Columns are used to create perspectives in folders in order to see document information in different ways. We can create new ones the Admin interface by going to the View Columns menu item to see the View Columns view. The view is categorized to show the Built-in columns or “system” columns, and the custom columns.
To create a new View Column, click on the Add New Column action button. The View Column Settings form will open and appears as shown in Figure 4.0.
The table below describes the options in more detail.
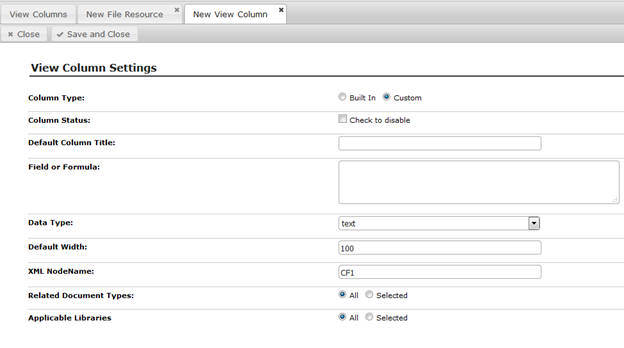
Figure 4.0
Column Type: | Identify whether this is going to be a Built-in or Custom column. |
Column Status: | Check the checkbox to make this field unavailable to the column properties dialog. |
Default Column Title: | Provide a default column title value. |
Field or Formula: | Provide a field name or provide a formula to use. For example, the Data Created built-in column uses the field named Date_Created for its value. A formula which determines if the workflow for a document has started looks like this: {{ f_IsWorkflowStarted() ? ‘Yes’ : ” }} |
Data Type: | Select the data type for the data that will be shown in the column. There are four data types, text, date, name and html. Select the appropriate type for the value that will be received in the column. For example, choose text if just a text field like Status will be in the column, or, date if a date will be in the column. Choosing the correct data type for the column will help DOCOVA handing the information properly. |
Default Width: | Provide a default width for the column in pixels. |
XML NodeName: | This is a system generated value and can be leveraged in more advanced development along with DOCOVA’s API. |
Related Document Types: | Select what Document Types the column is related to. This helps DOCOVA when creating perspectives. If a folder is going to have just one or two document types, this will help trim down the selection field in the column properties dialog to just the relevant columns to choose from. |
Applicable Libraries | Select which Libraries this column is available to. |
3.9. Custom Search Fields |
Custom search fields are fields that can be created that then become available for use in the Advanced Search dialog of searches in Views as well as in the Global Search app.
When creating a new Search field, Figure 1.0 shows what the Search Field Settings form looks like. In Figure 1.0, a search field named “Demo Field” is created. Figure 2.0 shows the Advanced Search dialog of a View (same as the Search app). Notice that the “Demo Field” search field becomes available to be used in the Advanced Search.
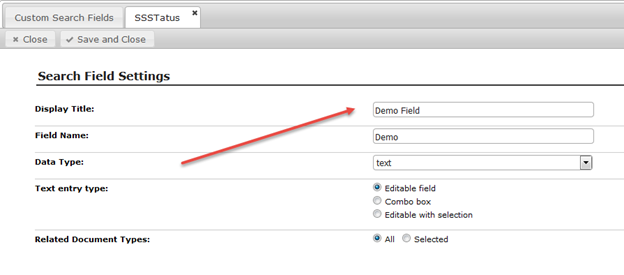
Figure 1.0
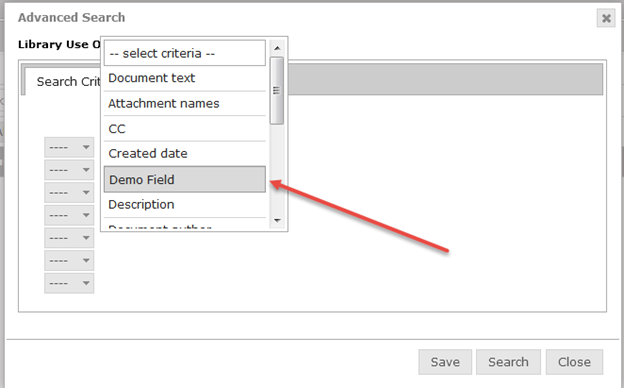
Figure 2.0
Display Title: | Provide a column header title. |
Field Name: | Provide the field to use for this column. |
Data Type: | Provide the corresponding data type to use for this column. |
Text entry type: | There are three entry types; Editable field: This will appear as just as an editable input field. Combo box: A combo box will be presented with the options provided in the field definition. Editable with selection: A selection field will be presented with the options provided in the field definition. |
Related Document Types: | Select the related document types that will be associated with this search field. When using the Advanced search, if the user selects specific document types, DOCOVA will only show the search fields relative to the selected document type. |
3.10. System Messages |
System Messages are found by navigating to the System Message menu option in the Admin app.
System Messages are messages that are leveraged by notifications in workflow steps. Figure 1.0 shows the default System Messages view in the Admin app.
When creating a workflow step, please refer to the Workflow section, one of the options is the System Message to use. The dropdown list is the listing from this view.
Admins can modify these default messages to suit their own organizations needs, or create new System Messages that can be used.
Figure 2.0 below shows the DEFAULT_ACTIVATE System Message and the System Mail Message Template form that is used to create System Messages. The table following Figure 2.0 provides more detail for each of the options.
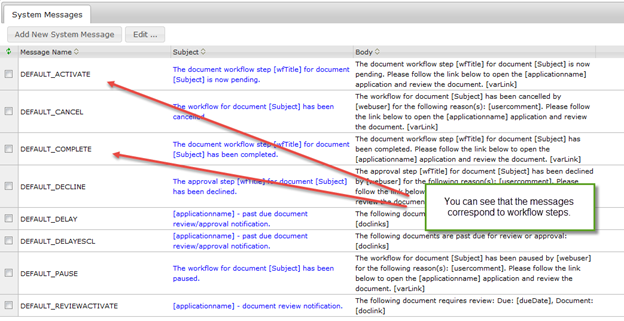
Figure 1.0
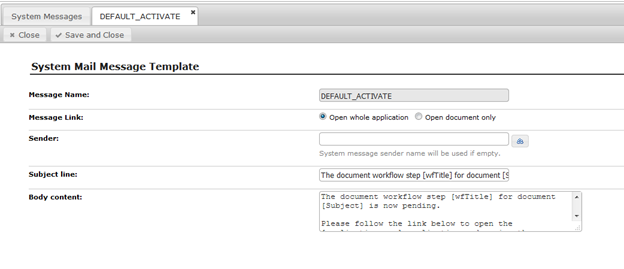
Figure 2.0
Message Name: | This is the name of the System Message. This is the name that will appear in the drop down selection options in the workflow steps. |
Message Link: | The message link is the behavior that the link has to the associated document in the notification message. For example, a user will get an email message letting them know that they need to take some action on a document as part of the workflow process…and a link will be in the message. This option will make the link either launch DOCOVA and navigate to the library and folder and document, or, it will just launch open the related document in its own dialog style window. |
Sender: | This is the From field in the message. |
Subject line: | This is the Subject line in the message. |
Body content: | This is the Body content in the message. |
3.11. Activities |
Activities are actions that are assigned to documents and people that may or may not require and action. For example, you might create a document and want a group of people to read it, but you must ensure that those people have read the document. You can set up an activity that ensures the action happens. This can be used to ensure everybody reads a company policy document as an example.
You can create default activities in the Admin interface by going to Activities in the menu. Figure 1.0 below shows a number of default activities.

Figure 1.0
Activities are used when creating documents. When creating Document Types that will be used, you can specify that the Document Type uses activities. When this option is turned on, an Activities button appears on the top right of a document created with that corresponding Document Type. Figure 2.0 below shows an Activity being created on a document.

Figure 2.0
When Activities are used, they are logged as users carry out the desired actions. Figure 3.0 below show the Activities tab in the More section of a document. This Activity Log appears when Activities have been enabled for a Document Type. The log is important because it will track actions like who has read the document for example.
The table below explains the different options available for Activities.
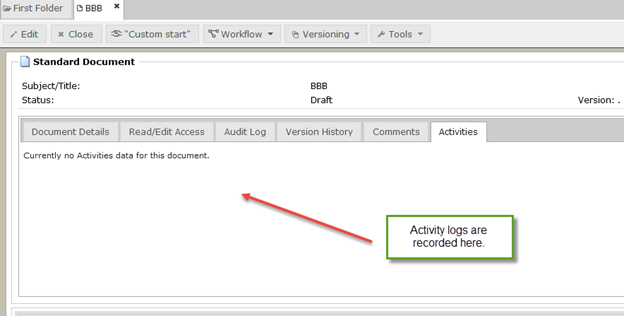
Figure 3.0
Action: | The Action dropdown selection field lists all of the Activity types that you pre-created in the Admin app. When selecting any of these pre-configured Activities, the Activity dialog is automatically filled in with those values. This allows IT or Admin to create pre-existing Activities that users can leverage. |
Obligation: | The Obligation of an Activity is what action the recipient must perform for this document type. There are three Obligation types; No Action Required This Obligation means that there is nothing that the recipient needs to do when notified. Acknowledgment Required This Obligation means that they must come to the document where they will get an automatic popup asking them to confirm that they have looked at the document. Users have to physically click on an option to prove they saw the document. Response Required This Obligation requires a response from the recipient. |
Notification: | The Notification options are to send an email or not. If no email is sent, the user will still see the Activity in their Activity list in the Activity widget. |
Who do you want to assign this Activity to? Document Owner: | This is who you assign the Activity to. The Document Owner is a convenient checkbox and others can be added from the company directory. |
Recipient(s) List: | The Recipients List is all the people wanted to send the Activity to. |
Activity Subject: | An Activity is like sending an email out, hence it has a Subject. |
Activity Message/Instruction: | An Activity is like sending an email out, hence it has an Activity Message/Instruction that goes in the body of the message. |
4. User Settings |
User Settings involve a number of user related information and configuration.
This section covers information on the User Profiles, Groups, User Subscriptions, Checked-out files and Deleted Users.
4.1. User Profiles |
The User Profiles define the settings related to each user in the system.
To create a User Profile, go to the Admin app and navigation to User Setting – User Profiles and click the Add User action button.
Figure 1.0 is what the User Profile form looks like. The table below provides more details about each of the options.

Figure 1.0
User Profile Options
General Tab | |
First Name: | First name of the user for this profile. |
Last Name: | Last name of the user for this profile. |
Display Name: | This is the display name for the user. Usually it is the first name and last name combined. Organizations may have reasons to modify this. |
Email Address: | This is the email address of the user. |
Username: | This is a calculated username. Usually it is the first name initial followed by the last name, however, it can also be something like an email address so users can login using a username that is their email address just as many system do. |
User Role: | A user of DOCOVA typically has one of two roles. One is Administrator, the other is User. Administrators have full access to the DOCOVA instance while Users have progressive access depending on access control rules. |
My Mail system: | DOCOVA can integrate with many email systems and hence the user can pick from several. |
Notify user: | When an Administrator changes the password of a User, or adds a User, this option will notify the user via email of the change. |
User Experience Tab | |
Workspace Style: | Select which workspace style to use, either Standard or Tiled. |
Mobile Workspace Style: | Select which mobile workspace to use, either Standard or Tiled. |
Can Create Applications? | Determines if the user can create new applications or not. The option is only available to Administrators to change and allows the user to modify the design of applications in the App Builder. |
Number Entry Format: | Specifies the default number format to show to the user in view columns and in forms. For example, a North American user might see a number formatted for thousands and decimals like 1,234.56 while a European user might use 1.234,56. |
Locale (Language): | Sets the language for the DOCOVA interface. Currently the languages available are English, French, German, Spanish and Japanese. Contact us for more languages. Note: Changing the language changes the DOCOVA system interface text. Text used to develop application will be in the text language used at development. Applications can be made multi-lingual through the application’s design. |
Time Zone (Region): | Choose the time zone in which you reside. Typically date/time values will follow the date/time of the local server. |
Load Library Folders: | For Libraries, when they are opened, the Folders contained in them are loaded. Here you can choose to load all the folders when you open the Library, or you can choose to open the Folders and sub-folders when they are clicked on. The reason for this is for performance sake. You may have a library that has many folders and sub-folders many levels deep and many within each level. Loading upon clicking loads only what you need and are interested in. |
Default View Show Option: | Documents in folders in libraries in DOCOVA are often go through a workflow. This means the documents can be in different statuses as they are drafted and move toward approval and release. By default, a folder will show Current versions, that is, documents that are approved and released. In the folder, any of these options can be selected on the fly. However, sometimes the documents in a view are not ones that need to go through any kind of workflow, hence, you may want to set this option to “All versions” to show everything no matter what their status is. The options available to set it to are; Current versions, All versions and Pending releases. |
Max Recent Edit Count: | This option relates to the ‘My Recently Edited Documents’ widget. It determines the number of records to be tracked and shown as being recently edited. This allows you to quickly see the last 10 documents edited, or perhaps the last 20, for example |
Max Recent Used App Count: | This option relates to the number of applications to show in the “My Recently Used Apps” section of the Applications Pane. You may want to only see the last 3 applications that you used, or the last 10 depending on what is easiest. |
Redirect to mobile client: | If you are accessing DOCOVA on your mobile phone and have the DOCOVA mobile application installed, you can set this option to “Auto Redirect” to have DOCOVA launch the native mobile client when DOCOVA URLs are launched from email instead of opening DOCOVA in the mobile web browser. |
User Experience Attributes: | These fields are used to enable automatic filtering of Library perspectives. For example, an Attribute of ‘Division’ with a Value of “West Coast” could be used to auto filter a perspective to only show records where the Division = West Coast. Since the Value could be specific for each user, perspectives can be made more efficient for users. The Attributes list is based on defined View Columns. This option only applies to Libraries. |
Avatar Tab | |
Dialog | The Avatar tab in the dialog looks like the following image. The Avatars of users are using in several places including in views and in documents.
|
Profile Picture: | Upload your profile picture. When uploading, DOCOVA will automatically resize the image for it’s avatar needs. |
Initials: | Add user initials. Usually these are capitalized. |
Pick Your Color: | If an avatar picture is not provided, the initials circle symbol will be used instead. By clicking on the circle you can pick a circle/initial color combination to use. |
Delegates Tab | |
Dialog | DOCOVA Delegates allow you to designate one or more users to Review or Approve documents on your behalf. For example, if you are going away on vacation. See the following image.
|
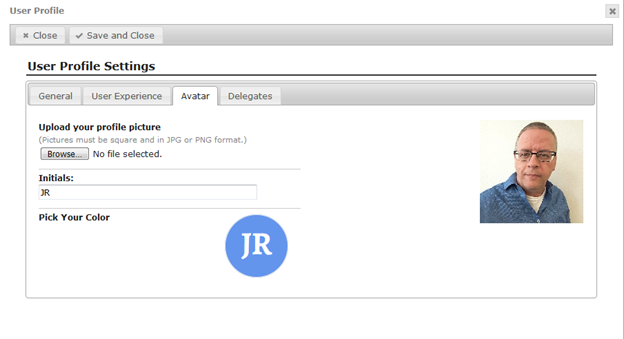
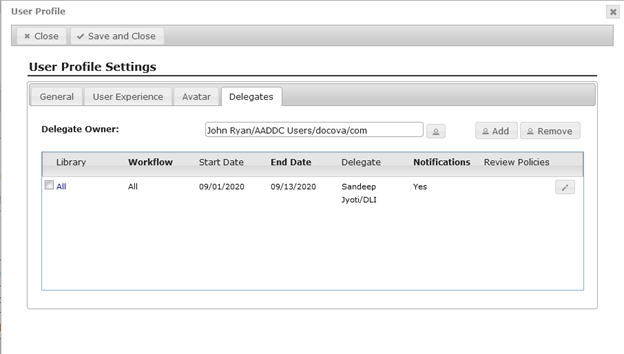
4.2. Groups |
DOCOVA provides the ability to create and manage Group of users. Groups can be used anywhere a Username can be used, like in notifications, permissions of a Folder or the Access Control List of an application.
To create a new Group in the Admin app, go to the User Settings – Groups menu item and click on the Add Group action button.
Figure 1.0 below shows the Group Definition form for adding a new Group.
To add a Group, provide the Group Name, Display Name, and the Type of directory that it is using for its users.
The table of users has two buttons on the top right side for removing and adding users. Figure 2.0 below shows an example of a Group that has been created.

Figure 1.0
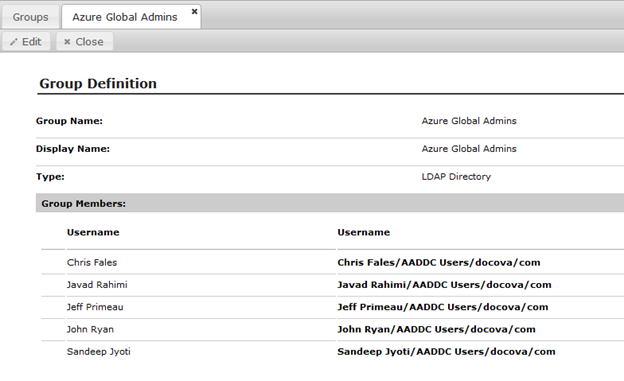
Figure 2.0
4.3. Checked Out Files |
DOCOVA documents can accept having file attachments added to them and these files can be edited in place, meaning, there is no need to download, edit and re-upload files in DOCOVA. However, for certain reasons users may want to download documents to their computers. Hence DOCOVA includes the concept of being about to check a file out (of a document) and then check that file back in when any edits have been completed. This check-in/check-out process is similar to checking a book out from a library and them checking it back in again later.
When a user checks a file out of DOCOVA, a log of that transaction is created and can be see in the Admin application under the Checked Out Files view.
The view shows who has a file checked out, and the document, folder and library of the parent document that it belongs to. This information is useful because if another user tries to check-out the same file, a dialog is displayed telling the user that the file is already checked out and who has the file checked out.
4.4. Subscribed Libraries |
The Subscribed Libraries view is simply a listing of all the users and the Libraries they are currently subscribed to.
Figure 1.0 below shows an example of a few users and the libraries they are subscribed to. This view is often used just as a troubleshooting reference for the most part.
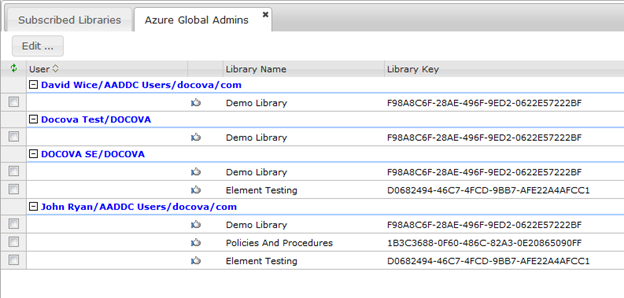
Figure 1.0
4.5. Deleted Users |
When a user is deleted in DOCOVA they are not exactly immediately deleted from the platform. Instead, this action has the affect of removing all of their access for the system.
This can be handy for having the ability to add and remove a set of users based on their need to access the platform or not without having to recreate them from scratch.
For example, a group of users may come together for a particular project that lasts a number of months, but then the project ends and these users dont’ need access to the system, hence for security’s sake, the users can be temporarily removed from the system until such time arises that they need access again for a new project.