 If you have many complex Notes applications, and you have an understanding of both Notes and Microsoft development, you know you cannot move them to SharePoint without some serious business process re-engineering. SharePoint and Notes are too different. The applications are going to have to change and in many cases it is not even doable.
DOCOVA will allow you to migrate those custom Notes apps to SQL, and provide the same level of functionality you had in the Notes and Domino environment. For the most part you get what you had, functionality wise, but on the SQL platform. Sound too good to be true? Check out this link.
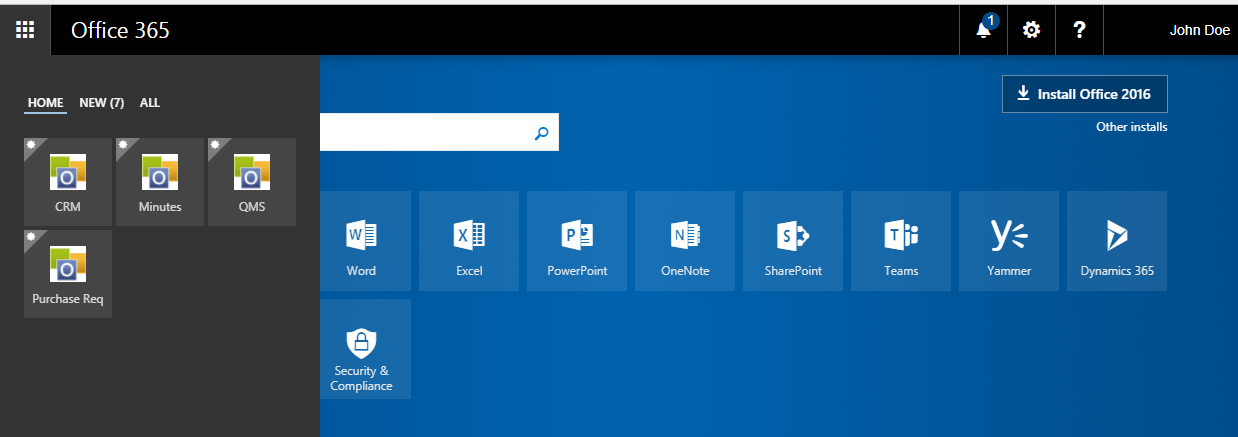
DOCOVA apps do not have to live within the DOCOVA interface. You can present them standalone via a URL. That means users can access them via their O365 portal using a custom tile. That provides an all Microsoft solution, at least from the user point of view.
Microsoft provides the following documentation and video clip on how to create a custom tile on O365. That will get you there…well almost. I spent several hours with Microsoft tech support getting it to work. Hopefully I can save you some time.
The high level tasks are as follows:
- login to the O365 portal at http://portal.office.com
- click on the ADMIN icon
- click on settings
- click on organizational portal
- scroll down to add a custom tile and fill in the fields on the form
- click on the 9 dots icon
- go to the new tab and hover over the tile
- pin the tile to home
I say almost because there are a couple of things you need to be aware of in order to get the tile to appear. In step 5 one of the fields on the form that defines the tile is a link to a graphic image. It has to be a valid link that your users can get to, and O365 will not tell you if it is or not. It will not display the tile until you get it right. Since you are using O365 a logical place to put the image would be SharePoint.
Follow these steps to add a graphic image for the tile to SharePoint:
- create a SharePoint site or open an existing site
- click on documents
- click on upload to upload an image
- select the image
- click on share
- click on the anyone option
Great…but you may see that the “anyone” option in step 6 is grayed out. If users are external to your organization, then you will have to generate an anonymous guest link, and to do that you may need to enable external anonymous sharing on the SharePoint site, if your security policy will allow that of course.
To enable external sharing in SharePoint do this:
- click on Admin from the main O365 portal
- cick on Admin Centers
- click on SharePoint
- select your SharePoint site
- click on Sharing
- click the option “allow sharing with all external users, and using anonymous access links”
A good way to determine if you have a valid link is to send the URL to a user. They can paste it into a browser and confirm that they can see the image. To get the guest link for the image, highlight the image from your SharePoint site and click Share and Copy Link.
Is the tile still not showing? Give it some time. It is not instantaneous. In fact, you will probably have to log out of the portal and back in again before it will appear.
If you find this topic of interest and want to learn more, check out this weekly webinar.